Okay, this isn't so much a real post as a statement that I love birthdays and baking, and therefore birthday cakes are like the best things ever. I normally am pretty great at making them taste awesome, but sucky at making them pretty. This cake is way basic, but pretty and I got excited and needed to post pictures of it. Plus, this frosting will probably send you into diabetic shock but is light and fluffy and beautiful and tastes amazing, so I have to give out the link so you can make it yourself.
fluffy buttercream frosting by Cooking Classy is to die for. I added extra vanilla extract and it was amazing!
I know this sounds weird, but my favorite part about this frosting recipe is that it covers my two layer 9 inch cake very well, plus even has extra frosting (about 2/3 cup) to use for other random things. Awesome. The only other change I made was to use tbsp of low fat milk instead of 4 tbsp heavy cream.
And if you couldn't tell from the last picture today is Jeff's birthday. Happy birthday to the best husband, partner, and father a girl could ask for. Here's to another great year. I love you!
I love potato leek soup. You can make it quickly, it tastes divine, and my favorite part... my version tastes like a million calories, but is actually pretty healthy. Woohoo!
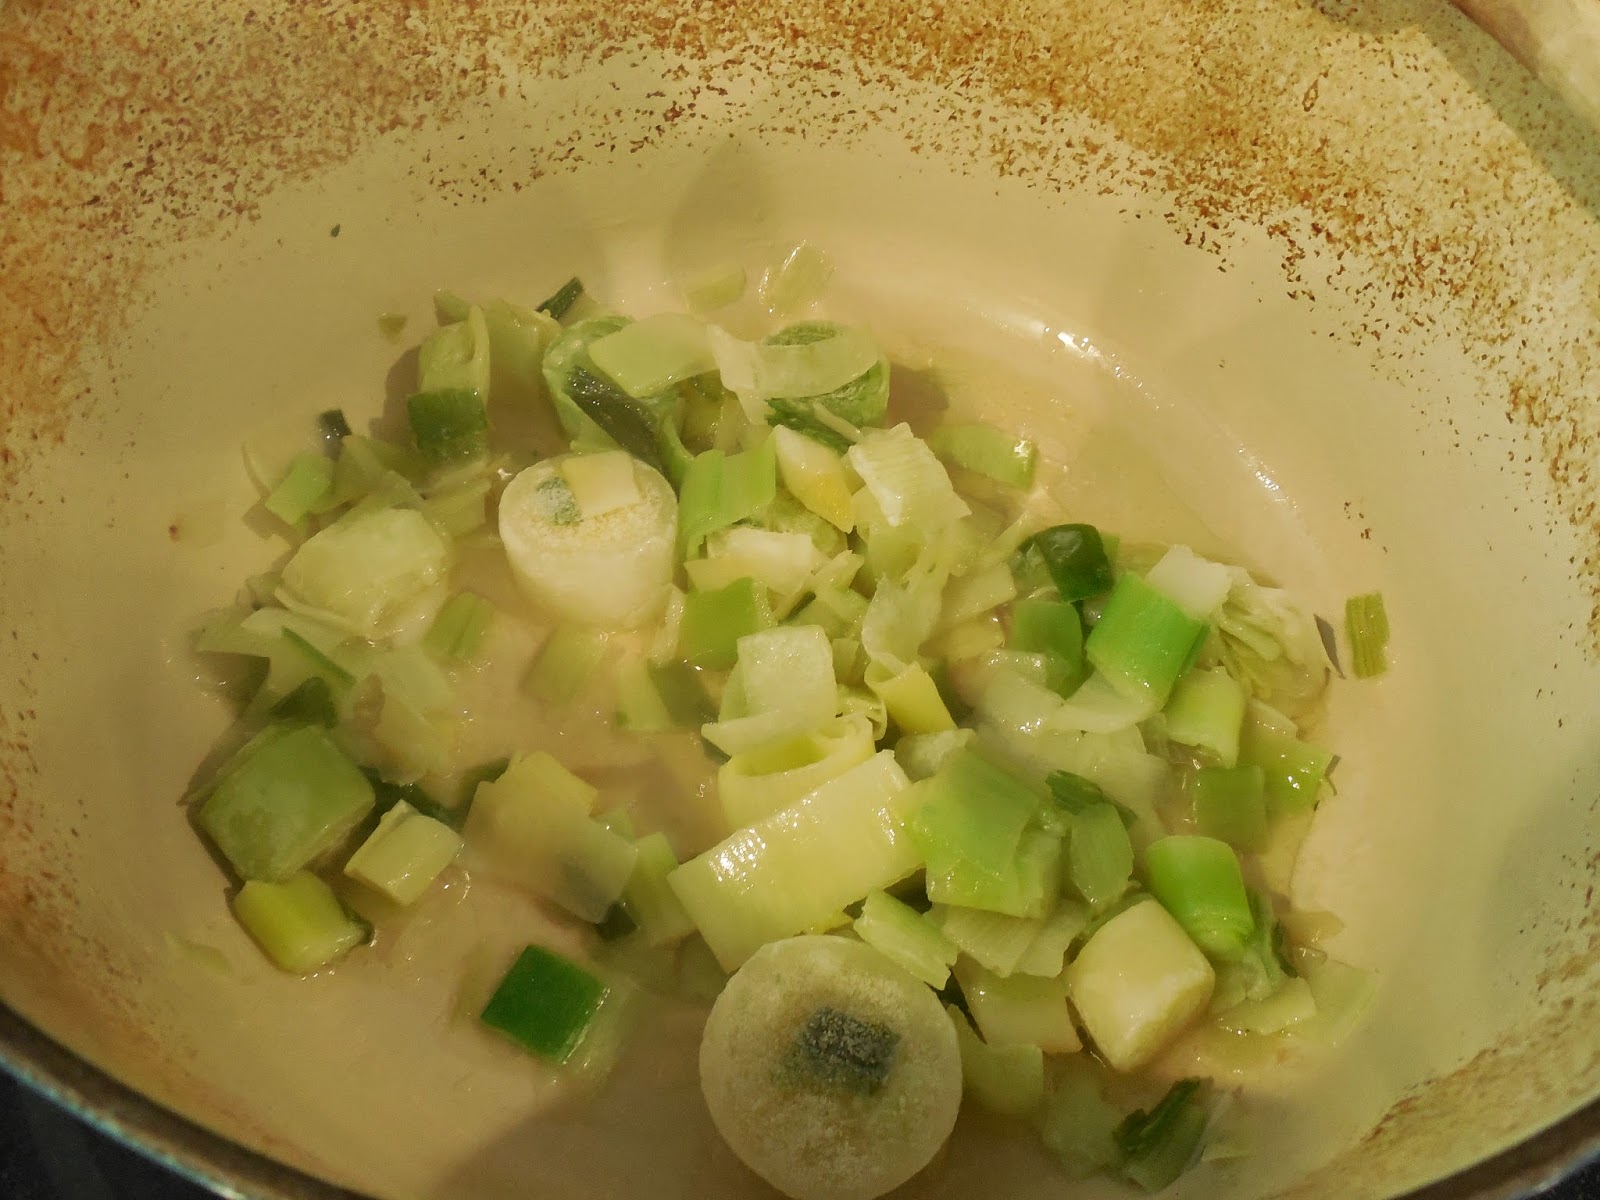
I used to always buy fresh leeks, but between a crummy selection most of the time and the ease and availability of frozen leeks, I get them frozen and sliced at Trader Joe's. So much easier and now I always have them on hand to use whenever.
Saute the leeks with a little olive oil and salt until they are soft and fragrant.
Rough chop about 4 medium yellow skinned potatoes. Why yellow skinned? They aren't as starchy as russets, plus Jeff likes his soup with the skin still on (keeping all the nutrients). If all you have is russet, that's fine, just peel them.
They don't have to be pretty, just try to get them sized the same as they will cook through evenly.
Once the leeks are soft add the potatoes and the chicken broth. I prefer using low-sodium broth because I can always add a bit of salt later on and I don't like my soup extra salty like many canned soups tend to be. That's why I love making my own instead.
There should be enough broth to completely cover the potatoes, but not so much that the potaotes are drowned under a few inches of broth.
Keep the soup on medium heat until the potatoes are at least fork tender. You can ignore the soup completely until the potaotes practically fall apart on their own if you want to. Yeah, this is the easiest and laziest soup ever.
Use an immersion blender or a blender to puree the soup. The consistency should be thick enough to stick on the spoon, but still liquid enough to drip. Don't worry about the soup being too thick though, the milk still needs to be added. Add in the black pepper and the parsley. I like to use fresh parsley normally, but I ran out, so dried parsley will do fine. When using fresh parsley make sure you use Italian flat leaf, not the nasty garnish kind. Yuck!
Take the soup off the heat and stir in the milk. It will marble the soup at first, so be sure to mix it in completely. If you don't like your consistency you can easily change it. If you want thicker soup add in a teaspoon of cornstarch mixed into a tablespoon of water. If you want thinner soup, add a bit more milk or broth.
Add a bit more parsley on top for decoration and voila! This soup is delicious and makes great leftovers. It will thicken in the fridge, so add a bit of broth or milk to it when reheating.
This soup tastes like it's so bad for you with the potatoes, salt, and milk making it thick, starchy, and very creamy. Most versions of this soup use butter and cream, which sound good but would most likely make me feel sick and fat after eating a single bowl. I'll take my version any day.
I love this soup because it is forgiving when you make it, it tastes simple and happy, it reheats well, and it is made with few ingredients which tend to be staples of mine, so I can make this even when I'm in desperate need of groceries.
print recipe
potato leek soup
by Liesl September-16-2014
simple, easy, and delicious
Ingredients
1 tbsp olive oil
1/2 tsp salt
1 cup (fresh or frozen) leek slices
4 medium yellow potatoes, rough cut, skin on
4 cups chicken stock (low-sodium)
1/2 tsp black pepper
1 tsp parsley (plus more for topping)
1 cup low-fat milk
Instructions
1. Saute the leek slices in the olive oil and salt until softened and fragrant. Add in the potatoes and chicken broth. Cook on medium heat until the potatoes are also soft. Add the black pepper and parsley. Puree the soup with a blender or immersion blender under soft, velvety, and completely smooth. Take the soup off the heat and slowly stir in the milk until mixed in completely. Add more salt if desired. Ladle into bowls and top with a bit more parsley.
Details
Prep time: Cook time: Total time: Yield: 4 servings
I totally love you all. You know, the two or three people out there total who might actually at some point read this. Anyway, I have not abandoned you, but this past week was bonkers and we leave for a weeklong vacation tomorrow. In about 9 hours from now. Oh, I should sleep at some point soon then! Oops.
Fear not. I have multiple posts planned to share the second I get back home. Well, maybe not the SECOND, but surely some time within a few days of coming home... Anyway, I have not forgotten about you, and maybe I'll even share some pretty pictures (taken by other people, you'll have noticed by now mine are not super). :)
This soup makes me so happy. It looks like sunshine and tastes like it too, mixed with lemons. It sounds strange I know. I don't usually think of lemons and soup together, but it works. The orzo and bit of cornstarch make the soup creamy and I just can't get enough of the color.
You know what else makes me happy? Cooking with wine. :) White wine can really kick up soup a notch. And a little for me, a little for the soup...
On a completely unrelated note, sorry about the lack of posts for the past week or so. Apparently it is really difficult to find time to blog while prepping for vacation and getting Liam ready to start preschool. He's growing up so fast! Crazy.
As oh so many of my recipes begin cut up the onion, carrots, and garlic and stir on medium heat with olive oil for about five minutes.
Add everything but the orzo and bring to a boil. Let simmer for 30 minutes.
Add the orzo and continue to cook on medium low. Stir fairly often to discourage sticking. Take off the heat as soon as the orzo is soft and enjoy! I love my soup with a nice piece of fresh bread and a glass of white wine. Delicious!
I like my soup fairly thick. If you want yours to be a bit thicker or thinner don't hesitate to add a bit more orzo or some more chicken broth.
print recipe
orzo soup
by Liesl September-3-2014
delightfully zesty and creamy soup
Ingredients
2 large garlic cloves, diced
1 yellow onion, diced
2 carrots, diced
2 tbsp olive oil
1/2 tsp salt
4 cups chicken broth
1 1/2 tbsp lemon juice
1 tsp cornstarch
1/3 cup white wine
1/2 tsp thyme
1 1/2 cup orzo
Instructions
1. Dice up the garlic, onion, and carrot. Saute in olive oil and salt on medium heat for five minutes until fragrant. 2. Add the chicken broth, lemon juice, cornstarch, white wine, and thyme. Bring to a boil and simmer for 30 minutes. Add the orzo, stirring often to avoid sticking. Feel free to add more orzo or broth to change the thickness to your tastes. Serve immediately.
Details
Prep time: Cook time: Total time: Yield: 4 servings
Liam is a smoothie addict. I'm pretty sure that he would eat all his meals in smoothie form if we let him. I figure if I'm already making a smoothie for him I might as well make enough for everyone. Between me getting bored quickly using the same recipe all the time, and my available ingredients always changing I am always looking for new smoothie ideas.
This recipe was adapted from one I found on the Self magazine web site. They have some great ideas, but I usually have to alter them a bit until I get them how I want them.
I really do not think of myself as a hippie, so I had to laugh a bit at this smoothie recipe. It calls for both almond milk and chia seeds, both things I currently had on hand. I had some almond milk on my freezer left over from the last time I made it here. Almond milk freezes really well. If you don't have any, that's fine. Just use regular milk.
I totally forgot to take pictures of the process, but really it's a smoothie. How many photos can you really take of a few ingredients sitting in front of a blender?
The kids (and I!) loved this smoothie. It wasn't too sweet, but you couldn't taste the carrot-y vegetable taste. Both kids sucked theirs down in a second and Liam tried to beg seconds. I probably could have made a second batch without worrying about it going to waste. Considering I only got to drink a third of this, it was pretty filling too!
This might be the quietest they have every been while awake and in the same room.
Note to self: it is difficult to take a photo of yourself holding a smoothie plus two wiggly boys. And brush your hair first!
print recipe
wake-up smoothie
by Liesl August-28-2014
a delicious fruit and vegetable smoothie that will keep you filled up all morning.
Ingredients
1 cup low-fat vanilla yogurt
8 oz can pineapple chunks including juice
1/2 cup unsweetened almond milk
1 carrot
1 banana
1 tbsp chia seeds
Instructions
1. Throw all the ingredients in a blender together. Turn on high and leave on for about 2 minutes, until everything is pureed. Pour into glasses and drink immediately. If your blender isn't very strong cut up the carrot before blending to help.
Details
Prep time: Cook time: Total time: Yield: 1-3 servings
Making egg rolls was really a spur of the minute idea. I already had the wrapper handy left over from making pumpkin raviolis. That plus my massive love of Chinese food meant I HAD to make egg rolls! Sorry for the bad photos.
Dice and chop all the veggies and tip them all into a medium sized pot with the pepper, garlic, sesame oil, soy sauce, and white wine vinegar.
Cook on medium-low for about five minutes. Stirring occasionally. The vegetables should have softened slightly but still have some crunch.
Take the pot off the heat and set up the assembly area. You'll need a clean surface to roll the egg rolls, egg roll wrappers in easy reach, somewhere to set the prepped egg rolls, a brush, and a small bowl with water.
This picture is horrible, but you get the idea. Point one end of the wrapper towards you and put a large spoonful of vegetable mix in the bottom center of the wrapper.
Fold the bottom corner up to the center.
Brush the two lines marked with arrows gently with water.
Fold the two sides in towards the center, making sure the wrapper seals the area brushed with water.
Brush the four open edges with water.
Push the vegetables towards you within the wrapper, tightly but not so tight as to break through the wrapper. Roll the wrapper away from you, pushing down the edges to ensure a good seal. Congratulations, you just made an egg roll. Not as much of a pain as you thought it would be, right?
Keep doing this until you run out of wrappers (like me because I had already used some from this pack) of filling. You should end up with about 12 egg rolls.
Heat some vegetable oil in a skillet about 1/4" deep, and turn the heat to medium. Prep somewhere to place the finished egg rolls. I don't like to lay them on paper towels becaue they tend to stick, so I like to use a cooling rack over a lipped pan (for quick and easy clean-up).
Once the oil heat up place several egg rolls at a time in the skillet. Don't overcrowd them. Four was the perfect amount for my pan.
They will cook quickly, so keep an eye on them. They only need about a minute or two a side.
They should be golden and crispy. Be careful not to let them get too brown. Once you have cooked them on both sides, set them on the cooling rack for several minutes. They retain heat very well, so let them cool off a little before eating.
I'll be honest, I never actually tried eating them by themselves. I'm a huge fan of sweet and sour sauce, so I had to dip every bite in the sauce. Jeff said they were pretty good plain, but he too loved them with the sauce.
I didn't have any sweet and sour sauce on hand, and this turned out really well. It's not my recipe though. sweet and sour sauce I left out the MSG, but otherwise followed the recipe, and it turned out soo yummy.
These egg rolls didn't last long, and I'm definitely making them again. For leftovers, pop them in the oven (or toaster oven) at 300 for just a few minutes until warm. That keeps them nice and crunchy!
print recipe
vegetable egg rolls
by Liesl August-26-2014
Ingredients
1 yellow onion, diced
1 celery stalk, diced
1 1/2 large carrot, shredded
1 cup jicama or water chestnuts, diced
1 cup cabbage, shredded
3 cloves garlic, diced
1/2 tsp pepper
1/2 tsp ginger
2 tbsp sesame oil
3 tbsp soy sauce
1 tbsp white wine vinegar
some oil for pan frying
12 egg roll wrappers
Instructions
1. Dice or shred vegetables and place in a medium pot with garlic, pepper, ginger, sesame oil, soy sauce, and white wine vinegar. Stir over medium-low heat for several minutes until the vegetables have softened slightly, but are still crunchy. Remove from heat. 2. Set an egg roll wrapper in front of you with one point towards you. Spoon about 1/4 cup of vegetable into the bottom center of the wrapper. Lift the bottom wrapper point over the vegetables to the center. Brush water on the recently folded edges. Bring the two side points to the center, making sure the water brushed edges have now been covered. Press lightly over the covered edges to seal. Brush water over the current four edges. Push the vegetables gently towards the you inside the wrapper and roll the wrapper away from you. The egg roll should now be sealed closed. Set it aside and continue this until you run out of wrappers or filling. 3. Prep a large skillet with 1/4" vegetable oil covering the bottom of the pan. Turn the heat to medium. Prep a resting place for finished egg rolls. Set a cooling rack over a lipped baking pan within easy reach of the skillet. 4. Once you are ready and the oil is hot place about 4 egg rolls at a time into the pan. Be careful for possible oil splatter. Don't crowd the egg rolls in the pan. They cook quickly, 1-2 minutes a side. They should be golden and crispy. When they are finished, use tongs to place them on the cooking rack, and put the next egg rolls into the pan. When the egg roll batches are through, move the pan aside and let the egg rolls sit for several minutes to cool. Serve with sweet and sour sauce. Store in an airtight container in the fridge, and reheat in the oven.
Details
Prep time: Cook time: Total time: Yield: 12 egg rolls
Apple crisp is one of those desserts that I always forget to make, but every time I do make it I think, "Why am I not making this all the time?!"
Apple crisp is great.
It takes about half an hour to make.
It's healthy for a dessert.
The ingredients are simple and almost always currently in the kitchen.
I say this is a healthy dessert. My version is at least. I don't use any butter. By far the most unhealthy part of my apple crisp is the brown sugar, and you can always cut that down yourself.
One of the other random things I love about this recipe, no mixing bowl needed. Dump everything directly into the 8x8 baking dish and mix together a bit with a wooden spoon.
As you can no doubt notice I leave the peels on my apples. Jeff and I like it this way, and I generally try to keep as much nutrients possible. Feel free to peel your apples.
My apple crisp gets its crispiness from the apples being partially cooked and soft, while keeping a bit of the uncooked crunchiness. The only other way to get crispness without butter is to almost overcook it so the edges begin to brown. That way is okay, but the majority of the apples get too soggy that way.
print recipe
apple crisp
by Liesl August-24-2014
Ingredients
4-5 small varieties of crisp apples like fuji and granny smith
1/2 cup unsweetened applesauce
1/3 cup quick oats
1/2 cup unpacked brown sugar
1 tbsp cinnamon
1/2 tsp nutmeg
1 tsp vanilla
1/4 tsp salt
Instructions
1. Slice (and peel optionally) apples. Preheat the oven to 375 degrees F. 2. Pour the applesauce on the bottom of an 8x8 baking dish. Pour the rest of the ingredients over top. Mix gently with a wooden spoon. Bake for 30 minutes. Eat immediately or cooled. Pairs very well with vanilla ice cream or whipped cream.
Details
Prep time: Cook time: Total time: Yield: 4 servings

 Okay, this isn't so much a real post as a statement that I love birthdays and baking, and therefore birthday cakes are like the best things ever. I normally am pretty great at making them taste awesome, but sucky at making them pretty. This cake is way basic, but pretty and I got excited and needed to post pictures of it. Plus, this frosting will probably send you into diabetic shock but is light and fluffy and beautiful and tastes amazing, so I have to give out the link so you can make it yourself.