Showing posts with label away from the kitchen. Show all posts

Wednesday, January 20, 2016

my first half marathon

Its been so crazy around here lately.  I know I haven't posted in a while.  I've been so busy I've been making the same recipes over and over.  Boring, I know.  You know you've been swamped when you still have your Christmas lights up mid-January (eep!)

Part of the craziness involved training and packing for our weekend trip to Anaheim to run the Star Wars Half Marathon.  My first!  Somehow I managed to convince my dad to run with me.  He gripped about it for months, but ran it anyway, beating me by a half hour!  We can't wait to do another already.  Although we got separated around mile 3 or 4, we till had fun.  If you've never done a Disneyland race you're missing out big time.  We ran through both Disney parks (complete with Star Wars character photo-ops!), and the city streets along the route were packed with high school cheerleaders (doing flips!), marching bands (some playing Star Wars music), people cheering in full Star Wars costumes, people holding funny and encouraging signs, people giving out drinks and candy (some not even affiliated with the race), and let's not forget the awesome people watching of the runner themselves.  Most of us wore costumes.  IT was awesome.

I decided to dress as Han Solo and my dad was a stormtrooper.


The boys had a blast wandering around Downtown Disney and the Disneyland Hotel the day before the race, just exploring and taking our time.  I had hoped not to walk too far the day before, didn't want to tire my feet out too much, so of course we passed by fitbit daily goal by 50% accidentally!


Dad and me the morning of the race, waiting in our slow people corral at 4:30 in the morning, after walking over a mile already to get from our hotel across the street through all the pathways to get to our corral.


I just had to pause running every once in a while for photos.  I couldn't miss the sunrise over California Adventure.  So pretty!


Radiator Springs is pretty nice first thing in the morning too.


There were so many people running!  I think I read that almost 12,000 people raced with us!  Crazy.  There were definitely a few times I was forced to walk because I got squished many a huge crowd going slowly.


I wish I could had gotten a photo myself with BB-8.  He's just so cute and my boys love him.  But his line was crazy long and I didn't want my time to be really slow.


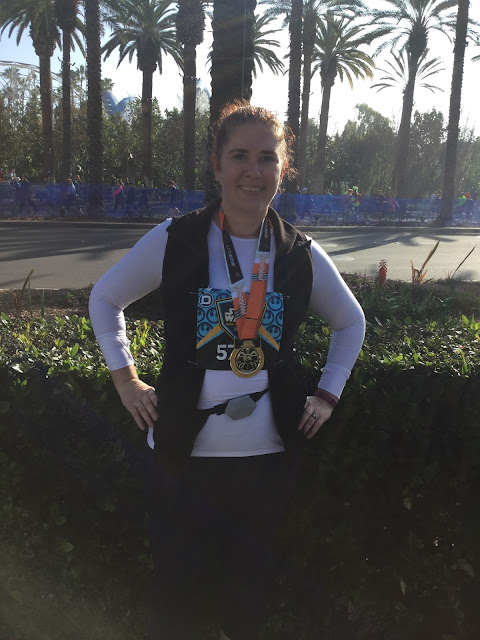
Yay!  I did it!  There were times I felt a little tired, but the fantastic crowd cheering us on almost the whole race, and the fun people watching helped a lot.  Since it was my first race I wasn't concentrating on speed, just not finishing last, and not hurting myself.


I am really glad my costume worked out fairly well.  I didn't know what to wear because the race started so early in the morning (5:30!) in January and I didn't want to be frozen.  I also didn't want to overheat too much.

I went for practical Han Solo.  My long sleeved running shirt with open black fleece vest, with navy compression capris (they had red electrical tape lines down the sides like Han's pants but those fell off around mile 2...).  My favorite part of my costume was my blaster holster.  I made it in 30 minutes the night before we left for the race.  No joke.  I wanted something to keep my phone, ipod, and hotel key in easily that fit in with my costume and wouldn't move or bounce.  This belt stayed in place great, perfectly held everything I wanted it to, and was really lightweight and comfortable to run in.


If you were interested in making your own holster here's how I made mine.  I used thick black elastic and cut a piece to fairly tightly fit around my waist.  I sewed the two edges to a black plastic clasp and covered the clasp with duct tape covered craft foam sheets (1 per side) in the shape of Han's buckle.  I cut out a holster in fake brown leather I found in the remnant bin at Joann forever ago in a shape that looked kind of like a holster, but would also fit my phone and ipod.  I cut out the top piece of leather a bit smaller, and also cut out two thin strips of leather to use for the snap closure.  Before I sewed the front and back leather pieces together I sewed a black elastic loop fit to go around my leg.  The whole thing took about half an hour to make and worked perfectly, even though it looks obviously a rush job.  If you want to make your own and have any questions, feel free to contact me!


Since all the photos of me wearing my belt are in the dark Liam is my model.  Can't you tell how excited he is about this?  :)


Oh, apparently Han roars at people so Liam told me I HAD to include this photo of him roaring.  With monster arms.  I'm pretty sure he has no idea who Han is...

Tuesday, November 24, 2015

reusable advent calendar


I LOVE looking at cute new Christmas ideas on Pinterest every year.  It's so addicting.  I'd seen a really cute reusable advent calendar for the last year or two, but didn't have time and figured it'd be expensive and time consuming to make.  I was wrong.  Between a few supplies I already had and the few I bought, plus the time to make this... would you believe I spent $12 and easily made it in an afternoon?  And everything I needed to buy for this I was about to find easily at Joann and Home Depot.

For all those interested, the original blog I got the idea off of can be found here.

Did you notice Luna?  She blends in a bit, but the only reason she seems to be in EVERY photo is because I told her to go away so I could take photos, and this was her way of demanding to be pet.  She eventually won.


Sorry about the glare.  It's really dark today, so it was either freakishly dark photo, or flash glare.

Here's what you'll need to make this calendar:

  • a 12x12 or 13x13 inch frame (this is a 13x13 shadow box frame with the glass removed)
  • 25 2" metal tins (Wilton's set of 25 can be found at craft stores in the wedding section)
  • cute paper (enough to back the frame, and cut out 50 circles, 2 per tin)
  • stickers, die cuts, or a pen for the numbers
  • metal sheets (I used two 7"x12" metal sheets with a bit of overlap, easy to find near lumber at home depot, cheap too!)
  • magnets
  • mod podge and small paint bush
  • glue gun
  • candy (I am using Hershey Kisses)


Start off by placing your metal sheet(s) and cute paper in your frame and get rid of the glass that came with the frame.  Hot glue the magnets to the back of each tin, making sure the magnet is strong enough first.  Cut out 50 circles to just fit inside your tins (I have an awesome hole punch that was the perfect size for this).  Split the circles in half.  Put the numbers 1-25 on half using stickers, die cuts, a pen, etc. Paint the mod podge over the numbered circles and put them into the lids.  They'll look ugly at first, but the mod podge dries clear, so no worries.  This next part is optional.  The Wilton tins set comes with 25 small round sticker labels.  Stick on in the center of each remaining circle and write an activity on it.  Place candy in each tin, put the lids on, and attach all the tins to the frame.  Done!


Two tips:

  1. an easy way to make sure your papers are festival and match is to use a stack of scrapbook paper.  I used a Christmas stack of 6"x6" paper and was able to cut 4 circles out of each page.  
  2. Make sure whatever activities you plan will work for each day.  For instance, I checked which days in December were weekends and put the significantly more involved things there.


I like that every year I can mix and match what things go on each day.  Over the years my kids will know what fun things are coming up in December, but never which day they'll be on.


I understand if you want all the numbers to match.  I didn't want to use a pen and my mom had the cricut at her house, so I used stickers.  I figured since the paper was all different the numbers should be as well.  I like the crazy hodge podge look I ended up with.


Some magnets list their strength or the amount of weight they can handle.  Aim for at least "medium", and make sure when you test your magnets (I taped mine onto a tin and stuck in on the frame) you do so with the candy you plan on using to make sure it's as strong as you need it!


That's it.  It's really easy to make and I love the end result!  It's exactly what I was hoping for.  If you want to include activities for each day but have NO idea what to put, here are some suggestions:

  • write letter to Santa
  • make Christmas cookies
  • look at Christmas lights
  • watch a Christmas movie
  • make fancy hot chocolate
  • make a gingerbread house
  • read The Night Before Christmas
  • make Christmas decorations
  • donate gifts
  • take a family Christmas photo
  • leave milk and cookies for Santa
  • discover new Christmas music
  • make paper snowflakes
  • sing carols
  • shop for sibling gifts
  • have a fireside picnic
  • build a massive fort
  • see a Christmas parade
  • read a new holiday story
  • game night
  • make peppermint playdough
  • make a red and green meal
  • family walk
  • make homemade hot apple cider
  • decorate the house
  • bring cookies to Shriner's hospital
  • make flavored caramel corn

I've seen other awesome ideas, but alas, most others need snow.  No such luck in California.

Let me know if you require help making your own, I hope you have lots of fun with this calendar!

Tuesday, October 20, 2015

DIY "The Incredibles" family costumes


Okay, this photo is a little fuzzy (camera phone), and we aren't all wearing our cool masks, but this is probably the best full shot of all of us.  Gotta love family costumes.  Plus, come on, it's cute when the 3 year old is the one picking out our costume theme.


This was an easy ensemble to make.  I bought Liam's full costume and Jeff's shirt because they were easy to find and super cheap on sale (whoop whoop!).  I bought a red shirt for me and a red onesie for Jack and made the two necessary logos in felt, then hand stitched them on.


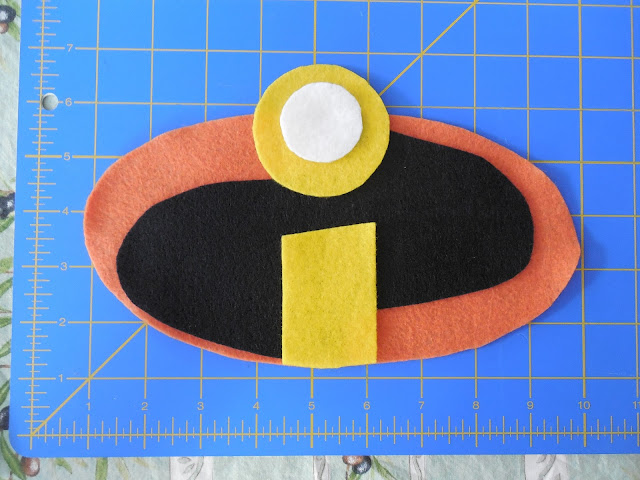
Not bad for eyeballing a logo and cutting it out in felt.  I found all the colors of felt I needed easily at Joann fabric.


Find a picture of the logo and eyeball it, cut out all your pieces, then stitch together.  It didn't take very long.


Step one: the large orange oval.


Step two: add the black over top and center.


Step three: add the yellow portion of the "I".


Step four: add the white portion of the "I".


Repeat as needed for multiple logos.  Stitch individual logo sections on in matching colored thread.


Sew the logo onto the top (onesie).


If sewing onto a women's top, keep in mind any stretch needed.  You might want to pin the logo onto the shirt while on a dress form (large pillow, etc.) to keep the correct stretch before sewing.


Grab the rest of your costume.  I used my newly logo-ed shirt, red leggings, black bike shorts, an orange spandex belt (I made this quickly with some fabric I bought), and a black mask.


Jack's hair had started going crazy by this picture (obviously), but we just had to be the Incredibles while our Jack Jack was still a baby.


This is the miracle photo, Liam actually posing!  This NEVER happens. He was just so happy to be The Incredibles, probably because he's the human embodiment of Dash.


This was a fun family costume to do, quick, easy, and cheap to make, and made it very easy to keep track of each other trick or treating (RED!).  Hopefully this can be of help to you.

Happy Halloween and costuming making!

Monday, October 5, 2015

yes, I'm still here

Yes, I'm still here.  It's been a crazy last month and really, it's just going to get crazier until January!  Oh wow.  I've been working like mad on Halloween things for all four of us, and prepping (and going on) our annual vacation.  I'm back now and should have some good posts coming soon.  I don't know how regularly I can post due to all the craziness, but please bear with me.  :)

Here's what I've been up to.  Keep in mind, all these pictures were only from last week.

Halloween related posts coming soon!

Jack LOVES Pluto, but got really shy meeting him.

meeting Red

my cute little beach bum

I love climbing beach rocks!

Crystal Cove

the boys finally got to visit UC Irvine

riding the train at Travel Town

our annual train photo

 La Brea Tar Pits

 LA County Museum of Art

LA County Museum of Art

 LA Natural History Museum

 boating in a Duffy by Balboa

 Jack passed out reading

 the rare legit Liam smile caught on camera

 nap time on the go

 Fashion Island Koi Pond

 Duffy ride

 this kiddo loves R2D2

 breakfast

 sunset at our hotel seeing Catalina

 beach baby

 my favorite view

 "it's poisoned! Yay!"

 Casa de Fruta Ren Faire

 my favorite little knight

 meeting an owl

family fun