Showing posts with label fruit. Show all posts

Monday, March 14, 2016

Strawberry Hand Pies for Pi Day!


Happy Pi day everyone!  March 14th is an awesome day because it gives me the perfect excuse to bake.  I've done classic pies and pizza (pies) before on Pi day, so this year I thought I'd shake it up a bit and make hand pies.

Hand pies are great because they are perfect for portion control, and if you forgo the icing (so sad!) they're a less messy dessert option for all those messy eaters out there.  Kids, I'm talking about you.


Another part of my decision to make hand pies was because I got a set of super cute molds for Christmas (here) and hadn't gotten a chance to break them in yet.  I just love fun kitchen gadgets.  Especially ones that I can easily chuck in the dishwasher.  Woohoo!

You can use my go-to pie crust recipe, your own favorite, or heck, even store bought.  Whatever floats your boat.


I put about a tablespoon of filling (essentially a quick jam, you could do any flavor filling you want, just nothing too liquidy) into he smallest sized mold.


This set is really easy to use.  I just lightly pressed down and gently flipped the hand pie out onto a lined baking sheet.


Bake at 350 degrees F for 25 minutes, rotating halfway through, and remove when the hand pies are firm and just barely beginning to turn golden at the edges.


Once the hand pies have cooled, drizzle with a basic icing.  Then eat them all.  :)

I used frozen strawberries in this recipe because I like the jammy consistency I know I can get every time with them.  Plus, even with the sugar they retain a bit of tartness, which I enjoy.


Strawberry Hand Pies
makes about 12-14

Ingredients:
Filling:

  • 16 oz. bag frozen strawberries
  • 1 tablespoon cornstarch
  • 1 teaspoon lemon juice
  • 1 Cup powdered sugar
Crust:
  • 2 1/2 Cups all-purpose flour
  • 1 teaspoon salt
  • 2 tablespoons sugar
  • 16 tablespoons (2 sticks) unsalted butter, chilled and cubed
  • 7 tablespoons ice water
Icing:
  • 1/2 Cup powdered sugar
  • 2 teaspoons milk
  • dash red food coloring

Directions:
  1. Make the crust.  In a food processor add the flour, salt, sugar, and butter.  Pulse until the mixture resembles wet sand.  Slowly add the water as needed until the mixture is a solid, bt not sticky.  Wrap in plastic and refrigerate at least 2 hours.
  2. Make the filling.  In a pot on medium high heat add the frozen strawberries.  Stir occasionally until they have fully thawed and have begun to break down.  Then stir in the cornstarch, lemon juice, and powdered sugar.  Use a potato masher to break up any large pieces of berry, otherwise just continue to stir occasionally until the filling begins to tighten up.  Remove from heat and let cool a bit.
  3. Preheat the oven to 350 degrees F.  After the crust has been refrigerated at least 2 hours roll it out thinly on a flour covered counter.  Use a dough press or a large round cookie cutter to cover the dough with circles.  Place 1 tablespoon of filling in the center of each circle and fold the circles in half, pressing the edges down.  Place the hand pies on a lined baking sheet and bake for 25 minutes, rotating halfway through.  Remove the hand pies from the oven when the edges are firm and only beginning to turn golden.
  4. Allow the hand pies to cool and make the icing.  Combine the powdered sugar, milk, and food coloring and mix well.  Gently drizzle the icing over the cooled hand pies and waiting for the icing to dry.  Enjoy.

Tuesday, February 23, 2016

Peach Crisp Overnight Oats


I think I've made it pretty clear how much I like a sweet breakfast, especially one I can grab as I'm running out the door in the morning.  This peach crisp overnight oats recipe is my new favorite.  Its perfect for this gorgeous early spring weather and makes me so happy when I eat it!  

I love the serious peachy flavor from the oats and at less than 300 calories per serving, plus 14 grams of protein this little jar will keep me going all morning.  It tastes like dessert, makes me happy, and doesn't make me hangry halfway through the morning like some other quick breakfast can.  

I like putting my overnight oats in cute jars so they're easy to grab the next morning, but it also helps with portion control.  Yeah, I'd probable eat more of it because its so good, but its really the kids I portion it for. They can be little rage monsters if I don't give them the right amount, but if its already in a little jar?  Crisis averted.  Yay!

I love making overnight oats because it takes ingredients I keep in stock anyway, one big bowl, and 5 minutes the night before to make.  You can't beat it.  Sometimes I'll double the batch or make single batches of different flavors.  My other favorite is chocolate.  


Peach Crisp Overnight Oats
serves 3

Ingredients:
  • 1/2 Cup unsweetened apple sauce
  • 6 oz. peach yogurt (1 yoplait container)
  • 1/2 Cup vanilla whey protein powder
  • 1 1/3 Cups old-fashioned oats, uncooked
  • 1 teaspoon cinnamon
  • 1/2 Cup unsweetened vanilla almond milk
  • 1-3 teaspoons sugar (optional)
Directions:
  1. Mix all ingredients in a large bowl until fully incorporated. 
  2. Portion into 3 airtight containers (mason jars, tupperware, etc.)
  3. Refrigerate overnight.  Enjoy cold.  
Note: These containers last at least a week in the fridge so don't worry if you want to make several batches at a time.


Saturday, February 20, 2016

Caramel Apple Pie


Who doesn't love pie?  Crazy people I guess.  This pie is delicious (and totally gone.  It really didn't last long!) and smells amazing.  Plus, it was super easy to make, and didn't require very many ingredients.

I know what you're probably thinking.  Geez, that crazy girl is posting ANOTHER dessert?  Does she ever make real food?  Okay, maybe you weren't thinking that.  ...But you probably are now I guess.  I do really love baking.  The smell alone is wonderful, but also because sometimes I get busy or really want something familiar.  I have posted many real food recipes, and I have more favorites that I won't post because they aren't mine, and I tend to not try as many new dinners as I do desserts.  I will try to post more savory dishes soon though.

Plus, look at these pictures.  Who wouldn't want to have this in their house?  It's a good thing I have three boys with sweet tooths here to eat most of my desserts or I'd be in real trouble.


I totally cheated and used a store bought pie crust.  I'll make pie crust if I have to, but in general if I'm going to cheat in my desserts it's going to be using store bough pie crust or puff pastry.  I'm pretty sure I'm NEVER going to make puff pastry.  EVER.


This pie is flat because I have a 10" pie pan and an 8" or 9" is really preferable.  Pies are so much prettier with a bit of a domed center.

Pies are even better a la mode.  Seriously, a scoop of vanilla ice cream on this pie is heavenly.


Caramel Apple Pie

Ingredients:

  • 8 apples, peeled and thinly sliced (I used braeburn and fuji)
  • 1 tablespoon lemon juice
  • 4 tablespoons unsalted butter
  • 1 tablespoon cinnamon
  • 1 teaspoon nutmeg
  • 3/4 Cup Kraft caramel bits
  • a pinch of salt (forgo if using salted butter)
  • 1 teaspoon vanilla extract
  • 1 egg
  • 3/4 tablespoon granulated sugar
  • 1 package 2 rolled pie crusts
Directions:
  1. In a large pot on medium heat stir together the apple slices, lemon juice, butter, cinnamon, nutmeg, caramel, and salt.  Stir occasionally to mix and prevent sticking.  Remove from heat when the apples have softened, and the caramels have melted.The mixture should not be overly runny.  Stir in the vanilla.
  2.  Preheat the oven to 425 degrees F.  Spray your pie pan with cooking spray and lay out the bottom crust.  Pour in the pie filling.  Apply the top crust.  I like using a lattice, but a full top is fine too.  Just be sure to cut a few slits in the top.
  3. Beat the egg and gently brush it over the crust.  Sprinkle the sugar over the wash.
  4. Bake for 35-40 minutes, until the crust is golden.  Remove from the oven and allow to cool completely on the counter before storing in the refrigerator.  Do not be concerned if the pie looks runny when hot.  Once the caramel cools the pie will firm up nicely.  Enjoy by itself or a la mode!

Tuesday, September 1, 2015

chocolate covered cherry smoothie


Sorry my blog posts have been a bit few and far between lately.  At least it feels that way.  From a few weeks ago through almost Thanksgiving is crazy for me.  My day planner seriously looks ridiculous.  I keep not having time to cook and/or post.  And its driving me crazy.

Since I haven't had much free time lately I've been creating new smoothie recipes.  I love a quick breakfast I can take on the go that's also healthy and delicious.  This smoothie is all of the above, plus only contains 4 ingredients!  It's a yummy no-brainer.

My frozen cherries are nice and sweet (without added sugar).  This smoothie is perfectly sweet even though the only sweetness comes from the cherries.  Make sure your cherries aren't too tart or you might want to add a bit of vanilla yogurt for the sweetness.  Can I say sweetness a bit more?  Yeah, I guess I can.  :)


I like to toss a frozen cherry or two on top.  They sink down and I eat them last.  I love cherries, these are better than normal because they're nice and cold and have a layer of chocolate smoothie covering them.  Yum...


Jack is going through a phase where he INSISTS on using a spoon for every meal.  Yes, even smoothies.  He's very civilized (read: nerd).  Although, I gotta say, watching a kid eat things like crackers and cheese with a spoon is pretty entertaining.


This smoothie is Jack approved.

Chocolate Covered Cherry Smoothie
serves 2

ingredients:

  • 1 scoop vanilla whey protein powder
  • 1 cup frozen cherries
  • 2 tbsp unsweetened cocoa powder
  • 1 cup almond milk
  • ice cubes (optional)
directions:
  1. Dump all ingredients in the blender and puree.  Optional ice cubes will make the smoothie thicker and icier.  Drink immediately.  Enjoy!

Thursday, August 13, 2015

double chocolate fig muffins


Try as I might, I just can't do these muffins in photos.  It's always difficult to capture the true yumminess of something when the chocolate makes them so dark.  I love these muffins.  They are dark, chocolatey, and fruity.


Want to hear something even better?  They're chock full of protein!  Each muffin has about 6 grams of protein in it.  This muffins are healthy (yes, they're still full of chocolate), yummy, and filling.  They are also approved by everyone at our house.

There is a very slight protein after taste, so if you REALLY are against that, just use more flour, less protein powder.  It's an even substitution.


Double Chocolate Fig Muffins
makes about 16 muffins

Ingredients:

  • 1 cup unbleached flour
  • 1 cup vanilla whey protein powder
  • 1 tbsp baking powder
  • 1 tsp baking soda
  • 1/2 tsp salt
  • 1 1/2 tbsp cocoa powder
  • 1 cup granulated sugar
  • 6 tbsp unsalted butter
  • 1 large egg
  • 2 tsp vanilla extract
  • 1 1/4 cup plain Greek yogurt
  • 1/2 cup mini semi-sweet chocolate chips
  • 3 large figs, diced
Directions:
  1. Preheat oven to 400 degrees F.  Grease your muffin tin.  
  2. In a medium bowl stir together the flour, protein powder, baking powder, baking soda, salt, and cocoa powder.  Set aside.
  3. Cream together the butter and sugar in a stand mixer.  Add in the egg and vanilla and mix again.  Mix in the Greek yogurt, then slowly add in the dry ingredients while mixing on low.  Do not over-mix.  The batter should be fluffy and light.  Gently stir in the chocolate chips and the diced figs.
  4. Evenly spoon the batter into the muffin cups and bake for about 20 minutes, or until an inserted toothpick comes out clean.  Let cool for 10 minutes, then remove from the muffin tin and let cool completely on a wire rack.
note: these muffins make a great healthy snack for kids.  If you want to make the recipe using mini muffins, bake for 16 minutes instead of 20.

Saturday, July 11, 2015

frozen yogurt tarts


I've been on a bit of a tarts kick as of late.  Can you tell?  I really wanted a healthier version, both for me, and for an easy snack for the kids.  These tarts are MUCH healthier than my previous recipe, and are mini sized (perfect for snacking!).

I got the recipe for the crust from Deliciously Ella.  I love her!  She's a super cute healthy girl from London.  A bit hippy for me sometimes, but great for easy, filling, low sugar, veggie recipes.  I had to alter her tart crust recipe a bit to suit me (and to account for the US measurements).

These tarts take about 45 minutes to make (plus freezing time), but you can make them the night or morning before you want them so easily.


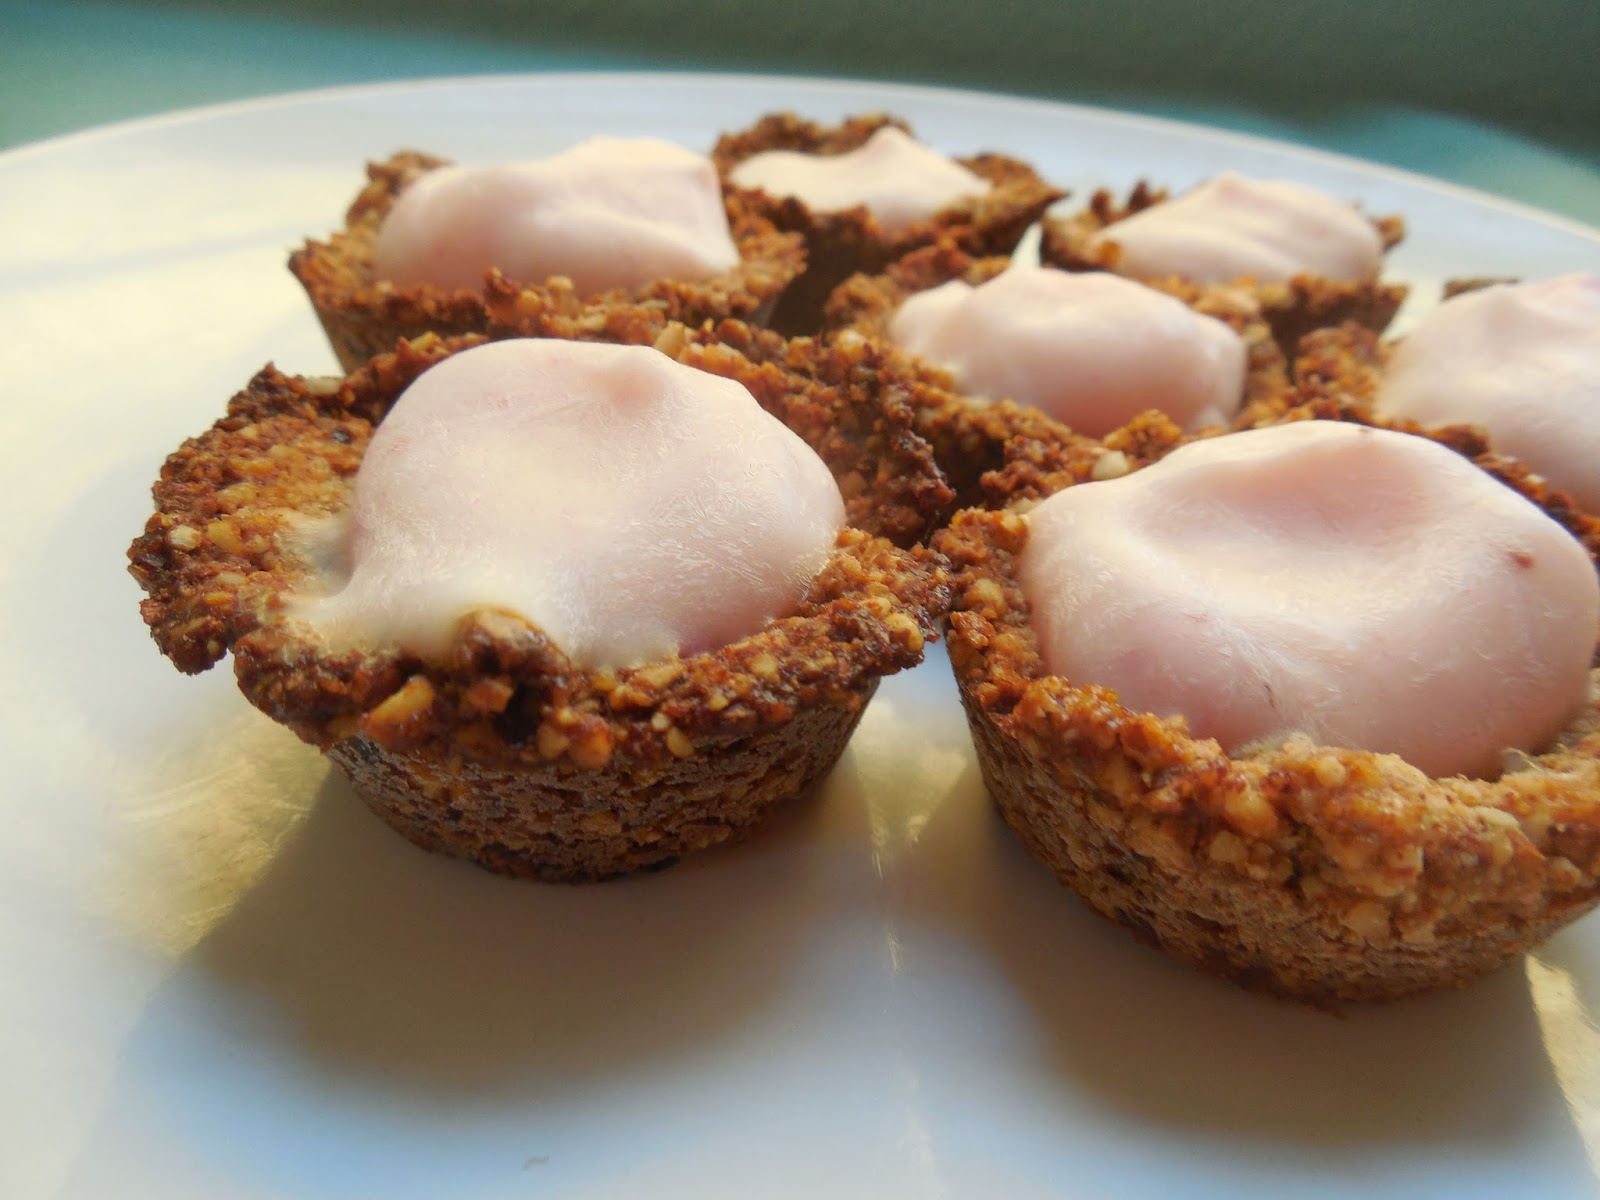
These tart crusts only use 4 ingredients.  So simple.  Almonds, dates, coconut oil, and water.  That's it.  Really.  I like mine a little coarse, but you can grind them finer if you like.  I find the easiest way to make these is to cut the dates into small pieces and soak them in a small bowl with the water and (melted) coconut oil until they have softened a bit.

While the dates are soaking pulse the almonds in a food processor until fine.  Pour the almond pieces out into a medium sized bowl.  Now pulse the dates in the water and coconut oil until there are no remaining chunks.  Pour this out into the bowl with the almonds and stir together with a wooden spoon.

Preheat the oven to 325 degrees F and lightly grease a mini muffin tin.

Ball up pieces the size of half your thumb (as a rough estimate) and press them down in each mini muffin mold, pushing the crust out gently up near the tops of the mold.  I ended up with about 21 tarts.  Bake for 15 minutes, then move and let sit about 10 minutes.  Remove carefully and place on a wire rack to cool completely.

I know the darker than average crust color might concern some of you, but almonds and dates are dark before baked.  Don't worry.  Nothing is burned.


Place the tarts on a large plate or tray to prep for the freezer.


I had the PERFECT amount of yogurt in one container to exactly fill all my tarts.  Just spoon a dollop into the center of each tart.


Place the tarts in the freezer until the yogurt has firmed.  Freezing the tarts makes them so refreshing on a hot day, and there's WAY less mess for the kiddos!


Look at how pretty and simple these are.  You could eat them like this.  Or...


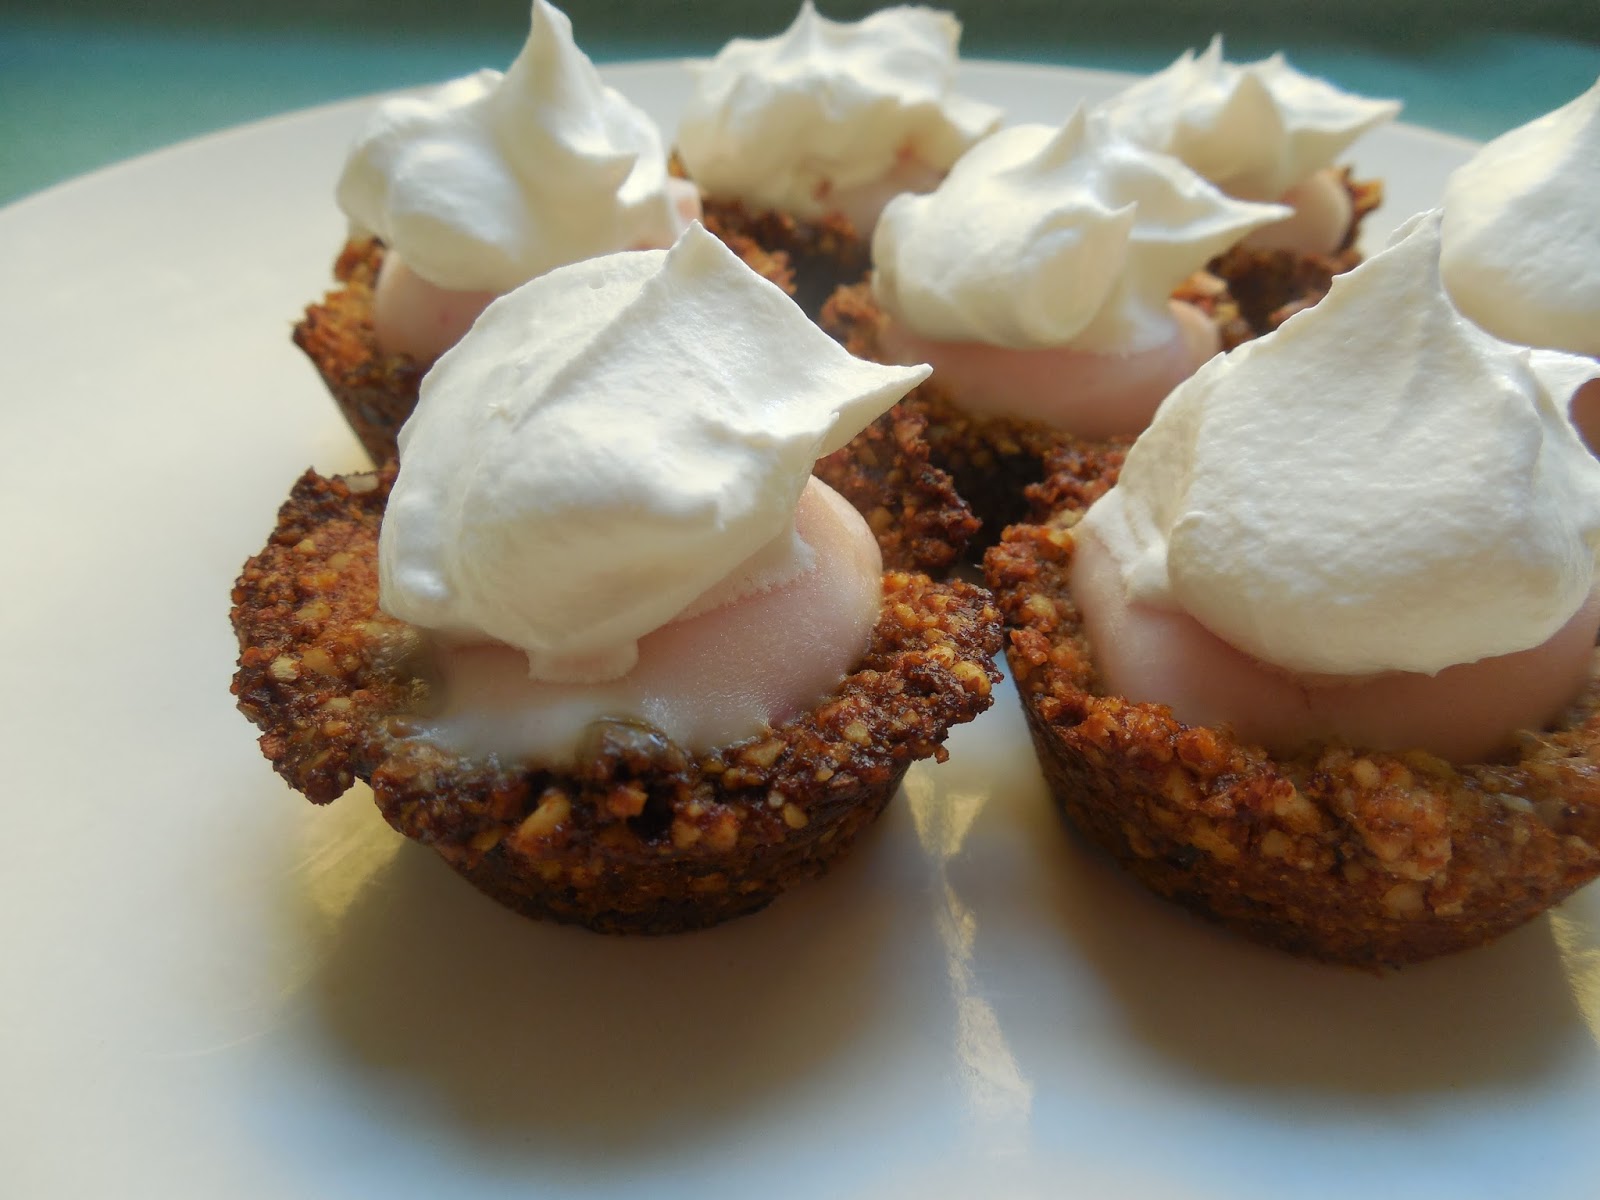
...you could spoon a nice dollop of lite cool whip on top of each tart.  Really, it makes all the difference in the world.  Now you have a still pretty healthy dessert that is great for hot days, good for kids, not messy, and perfectly bite sized.

Not enough reason to make these?  Well, they are also super easy to make, required very few ingredients, can be made in advance  Shall I go on?


In short these tarts are sweet, tart, nutty, chewy, refreshing, and creamy.  What's not to love?

You could even go one step further in telling yourself to make these by remembering that the ingredients include whole almonds and yogurt.  Very good sources of protein you know.

And cool whip not included, I happened to have all the other ingredients necessary already in stock.


frozen yogurt tarts
makes 20-22 mini muffin sized tarts

ingredients:

  • 7 ounces of whole almonds
  • 3 tbsp coconut oil
  • 2 tbsp water
  • 10 medjool dates
  • 1 container of strawberry yogurt (I used yoplait original)
  • lite cool whip
directions:
  1. Cut the dates into small pieces and place into a small bowl to soften with the coconut oil and the water.  While they soak grind the almonds in a food processor (coarse or fine, up to you).  Pour the ground almonds out into a medium bowl.
  2. Pour the date mixture into the food processor and puree.  Pour the mix out into the almond bowl and stir to combine with a wooden spoon.
  3. Preheat the oven to 325 degrees F and oil a mini muffin tin (24 muffin capacity).
  4. Grab crust pieces about half the size of your thumb and gently push into the base of each mini mold, then push up the sides evenly.
  5. Bake for 15 minutes, or until edges have darkened a bit.
  6. Remove from oven and let rest for 10 minutes before removing from the mold and letting cool completely on wire racks.
  7. Place crusts on a large plate or tray and gently spoon strawberry yogurt into the center of each tart.  Freeze the tarts.  
  8. Remove from the freeze and top each tart with a large dollop of lite cool whip.  Serve.


The crust recipe is a lightly edited version from Deliciously Ella.


Monday, July 6, 2015

mini tart cups


These mini tart cups are so cute and easy.  They are the perfect snack size, and can be made in so many flavors and varieties!  All you need is any sugar cookie, cracker, or shortbread dough that can be rolled out.  I used a biscuit cutter with a scalloped edge because it makes the tart edges prettier.


Gather up your favorite dough recipe (that can be rolled out), a muffin tin, and a biscuit cutter slightly bigger than the muffin tin base.

Roll out your dough fairly thin because it will puff up a bit when it bakes, and you want plenty of room for tart filling!  I should have rolled this batch a bit thinner, but they still worked fine.  Just don't roll your dough CRAZY thin, because you want the tart crust sturdy enough to support the weight of your filling.


Use your biscuit cutter and cut out the dough in slightly bigger circles than the bottom of the muffin tin openings.  Spray the muffin tin well with cooking spray before you lightly press the dough in and they'll pop out easily after they're baked.  Grab a fork and poke 3-4 times on the tart bottoms to prevent them from puffing up too much.


I baked this batch for 18 minutes, then let them sit for about 2 minutes before I removed the tart cups to a wire rack to cool completely.

You can easily make these a day before you need them if you store them in a cool dry place.  I made these ahead of time, and I made the custard filling the day before as well.  I piped the custard into the cups right before I needed them and topped them with strawberries and blueberries.  So easy!  I love these tarts.  They taste yummy (seriously, I need an intervention to stop eating them all!), they were really easy, you can make them in advance, and they look super fancy.


Tarts are great for parties because you can just grab them and you don't need a fork or even a plate.  I love grab and go foods!  I've already got a bunch of tart variations I want to make too.  One the top of my list?

  • shortbread cup + chocolate pudding + whipped cream dollop
  • graham cracker cup + chocolate ganache or pudding + toasted marshmallow
  • chocolate sugar cookie cup + strawberry Greek yogurt
  • sugar cookie cup + strawberries + whipped cream dollop
  • peanut butter cookie cup + Reese's peanut butter cup


mini tart cups

ingredients:

  • 2 cups AP flour
  • 2 tbsp sugar
  • 1 tsp salt
  • 1/2 butter, cut into small pieces
  • 1 egg
  • 3 tsp milk

directions:

  1. In a food processor, blend the flour, sugar, salt, and butter until it resembles coarse sand.   Pulse in the egg, then add in the milk and pulse until the dough comes together.
  2. Wrap the dough in plastic wrap and refrigerate for 30 minutes.
  3. Preheat the oven to 350 degrees F.  Flour you counter and roll on the dough fairly thin.  Use a biscuit cutter slightly larger than the muffin tin base and cut out your dough.  Gently press into the greased muffin tin and lightly stab 3-4 times with a fork.
  4. Bake for 18 minutes, until the edges are lightly golden.  Remove from the oven and let sit for 2 minutes before removing the cups onto a wire rack to cool completely.
  5. Once cooled, fill cups and serve, or set unfilled cups aside in airtight container in a cool dry area.  Cups can always be filled and served the next day.  Once filled try to consume the cups within 3 days or the cups will start becoming soggy on the inside.

Saturday, June 13, 2015

plum ice cream


I love fruit in general, and plums are no exception.  They are sweet and tart, and a very convenient tiny size.  However, I can really only make so many plum tarts and pies before I get REALLY bored, and I have a ton of plums right now, thanks Jenna!  Have I mentioned before how awesome it is to have generous relatives with fruit trees?  Anyway, I was searching for new plum recipe ideas on Pinterest (of course!) and I saw plum ice cream.  None of the recipes were exactly what I wanted, so I made up my own.  I'm so glad I did!  It turned out great.  Sweet, tart, a beautiful consistency, and the most gorgeous color pink I've ever seen.


I just LOVE this color!  No food coloring necessary.  Puree all the ingredients and refrigerate for 2 hours. THen just churn in an ice cream maker, and freze.  Soo easy!


I love the consistency of this ice cream.  Some ice creams have to sit on the counter for 5 minutes before they are soft enough to scoop, and some ice creams are so soft they they are practically liquid.  This ice cream is a perfect medium.  Soft enough to serve immediately out of the freezer, but holds it shape post scooping for plenty of time before melting.


plum ice cream
makes 1 1/2 quarts

ingredients:

  • 2 cups of plum puree
  • 3/4 cup sugar
  • 1 tsp vanilla extract
  • 1 cup strawberry yogurt
  • 1 1/2 cup heavy whipping cream
directions:
  1. Puree all the ingredients together in the blender.  
  2. Refrigerate the puree for 2 hours.
  3. Churn in an ice cream maker according to its directions.  Mine needed 25 minutes and perfectly filled the 1 1/2 quart capacity.
  4. Scoop ice cream out into a freezer safe container with an air tight lid.  Freeze at least 1 hour.
note: I pureed lots of plums by themselves.  I poured out the excess after the needed 2 cups and froze for smoothies later.  I then added in the rest of the ice cream ingredients and pureed.


Friday, May 22, 2015

peach frozen yogurt


I love the quick easy fix for dessert.  Who doesn't? Especially when its pretty darn guilt free.  Even better, its ready in less than 30 minutes.


All you need for this frozen yogurt is a tub of vanilla Greek yogurt and a 1 pound bag of frozen peaches.  I tend to keep extras of both in stock, so I can make this any time.  Woohoo!


Stick the whole tub worth of yogurt and the whole bag of peaches into the blender and puree.  If you want to set aside several peach slices to dice and mix in later, that's fine, but I prefer my frozen yogurt smooth.

I like my frozen yogurt a bit sweet, with the tangy tartness of barely sweetened yogurt, but if you're not used to that, or you want to splurge a little go ahead and add a tablespoon of sugar now.


Pour the mixture into a prepped ice cream maker.  My model can hold up to a quart and a half, and this makes that exactly.

I only needed to churn the frozen yogurt for 15 minutes until it was crazy thick.  At that point you could eat or freeze for later.


Freeze in a freezer safe container with a tightly fitting lid.  I like to freeze my yogurt for about an hour after churning so its really thick.  If you wait until the next day or so to eat set the frozen yogurt container on the container for several minutes before scooping.  It will be pretty hard.


This yogurt is great for kids because its a great sweet frozen treat for hot weather and isn't full of extra sugar.

My goal is to try every fruit flavor I can think of by the end of the summer.  I'm thinking maybe cherry or raspberry next... yum!


Peach Frozen Yogurt
makes 1 1/2 quarts
20 minutes total time

Ingredients:

  • 1 tub of vanilla Greek yogurt (preferably non-fat)
  • 1 pound bag frozen peaches
  • 1 tbsp sugar (optional)
Directions:
  1. Empty the full containers of yogurt and peaches (and sugar) into a blender and puree.
  2. Pour mixture into a prepped ice cream maker and churn 15 minutes.
  3. Eat directly or scoop into a freezer safe container with a tight lid.