Showing posts with label yogurt. Show all posts

Saturday, July 11, 2015

frozen yogurt tarts


I've been on a bit of a tarts kick as of late.  Can you tell?  I really wanted a healthier version, both for me, and for an easy snack for the kids.  These tarts are MUCH healthier than my previous recipe, and are mini sized (perfect for snacking!).

I got the recipe for the crust from Deliciously Ella.  I love her!  She's a super cute healthy girl from London.  A bit hippy for me sometimes, but great for easy, filling, low sugar, veggie recipes.  I had to alter her tart crust recipe a bit to suit me (and to account for the US measurements).

These tarts take about 45 minutes to make (plus freezing time), but you can make them the night or morning before you want them so easily.


These tart crusts only use 4 ingredients.  So simple.  Almonds, dates, coconut oil, and water.  That's it.  Really.  I like mine a little coarse, but you can grind them finer if you like.  I find the easiest way to make these is to cut the dates into small pieces and soak them in a small bowl with the water and (melted) coconut oil until they have softened a bit.

While the dates are soaking pulse the almonds in a food processor until fine.  Pour the almond pieces out into a medium sized bowl.  Now pulse the dates in the water and coconut oil until there are no remaining chunks.  Pour this out into the bowl with the almonds and stir together with a wooden spoon.

Preheat the oven to 325 degrees F and lightly grease a mini muffin tin.

Ball up pieces the size of half your thumb (as a rough estimate) and press them down in each mini muffin mold, pushing the crust out gently up near the tops of the mold.  I ended up with about 21 tarts.  Bake for 15 minutes, then move and let sit about 10 minutes.  Remove carefully and place on a wire rack to cool completely.

I know the darker than average crust color might concern some of you, but almonds and dates are dark before baked.  Don't worry.  Nothing is burned.


Place the tarts on a large plate or tray to prep for the freezer.


I had the PERFECT amount of yogurt in one container to exactly fill all my tarts.  Just spoon a dollop into the center of each tart.


Place the tarts in the freezer until the yogurt has firmed.  Freezing the tarts makes them so refreshing on a hot day, and there's WAY less mess for the kiddos!


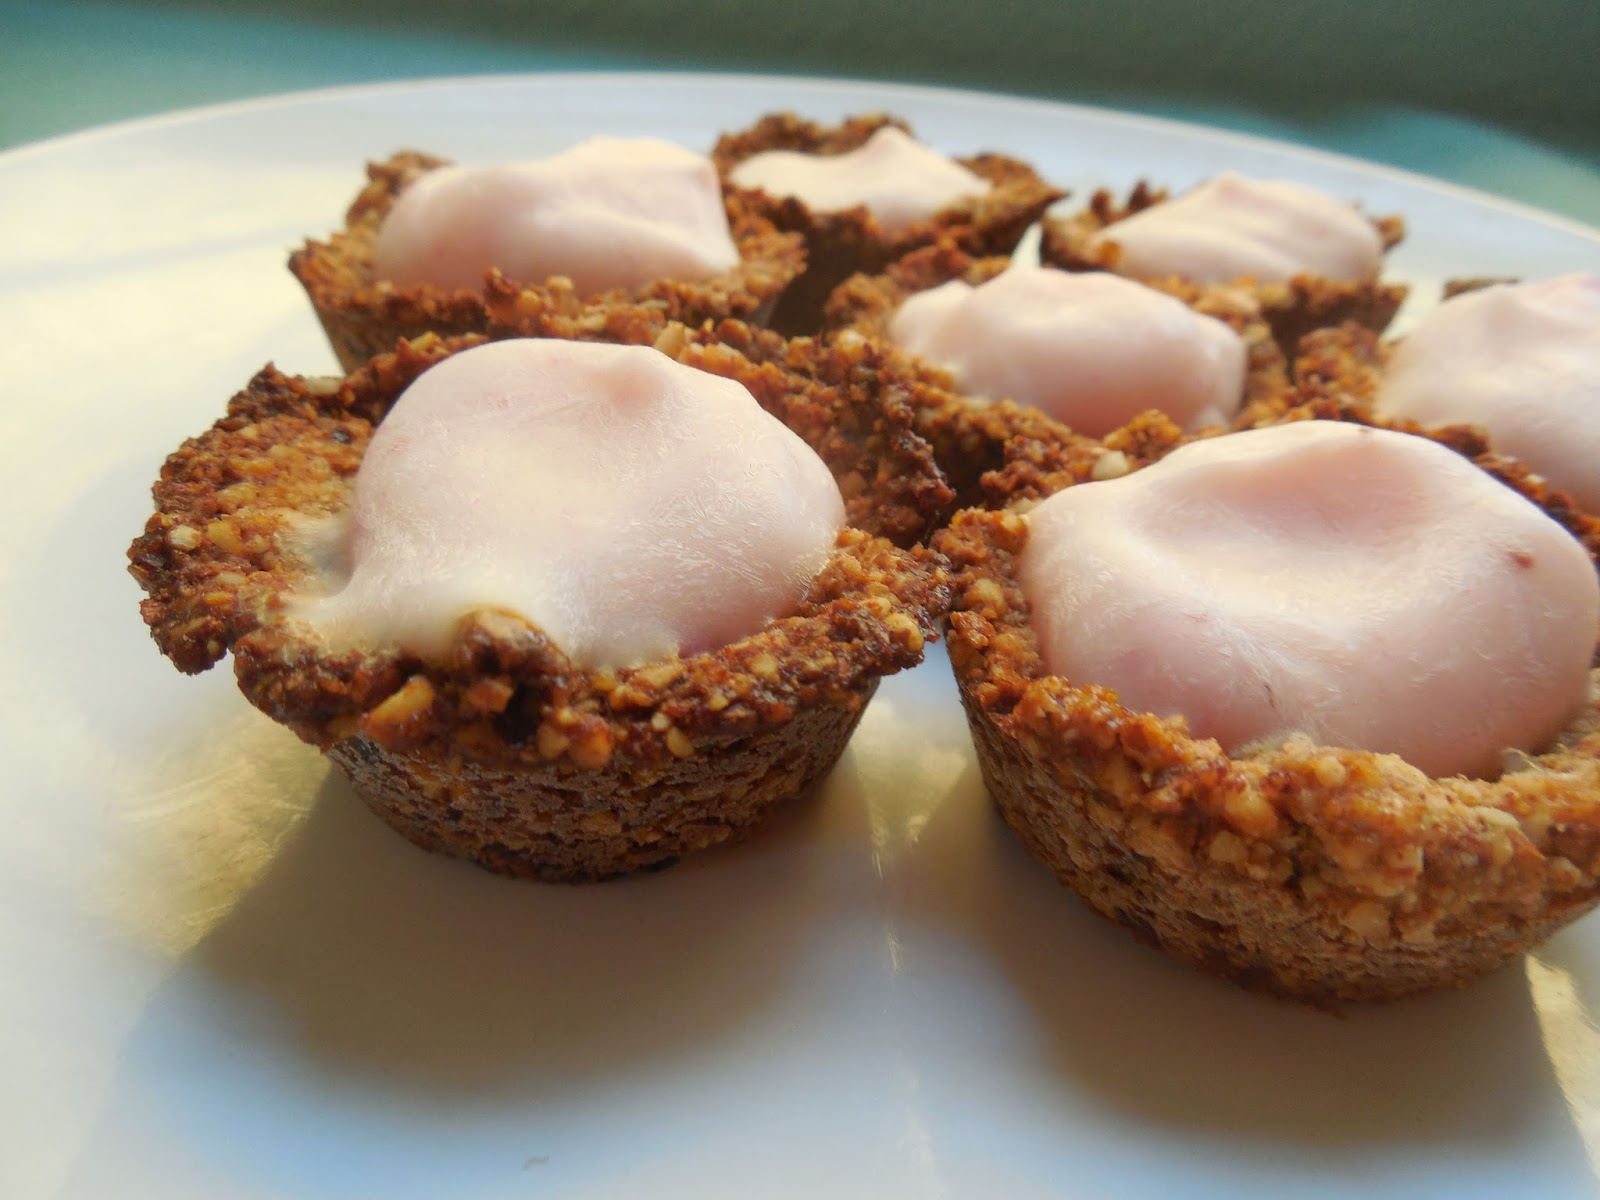
Look at how pretty and simple these are.  You could eat them like this.  Or...


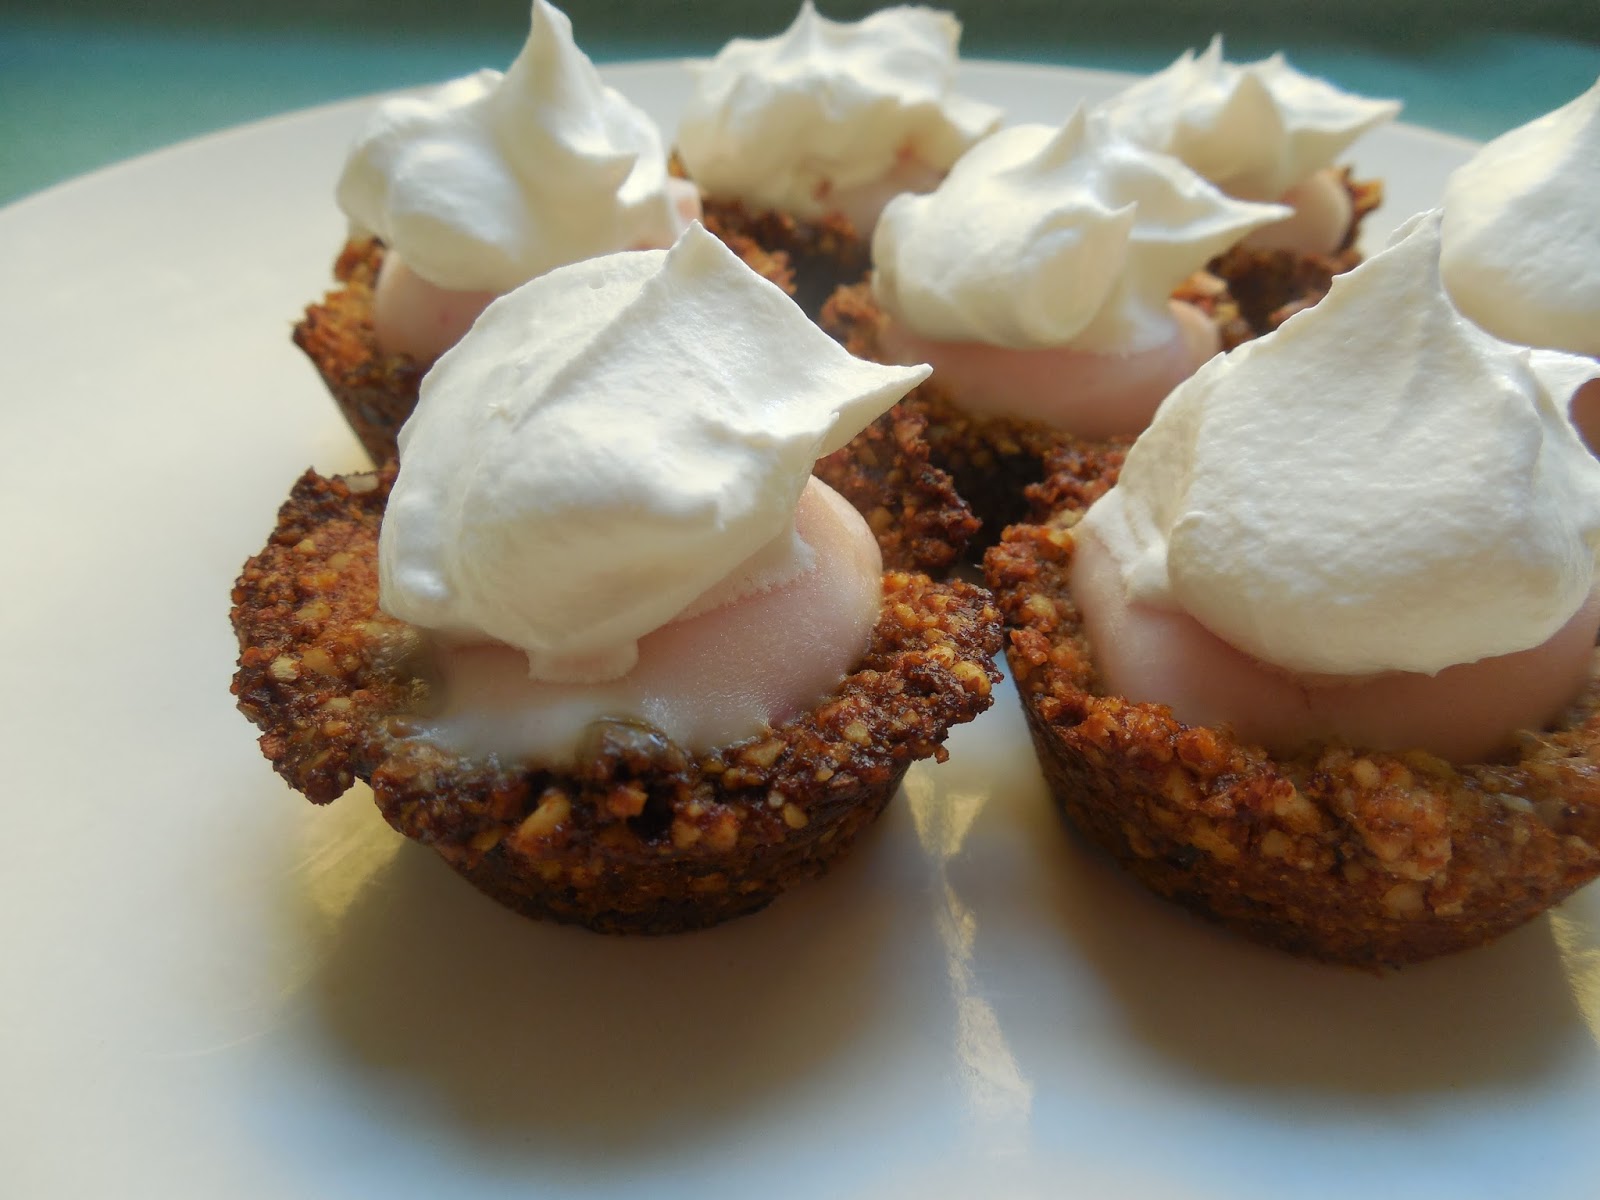
...you could spoon a nice dollop of lite cool whip on top of each tart.  Really, it makes all the difference in the world.  Now you have a still pretty healthy dessert that is great for hot days, good for kids, not messy, and perfectly bite sized.

Not enough reason to make these?  Well, they are also super easy to make, required very few ingredients, can be made in advance  Shall I go on?


In short these tarts are sweet, tart, nutty, chewy, refreshing, and creamy.  What's not to love?

You could even go one step further in telling yourself to make these by remembering that the ingredients include whole almonds and yogurt.  Very good sources of protein you know.

And cool whip not included, I happened to have all the other ingredients necessary already in stock.


frozen yogurt tarts
makes 20-22 mini muffin sized tarts

ingredients:

  • 7 ounces of whole almonds
  • 3 tbsp coconut oil
  • 2 tbsp water
  • 10 medjool dates
  • 1 container of strawberry yogurt (I used yoplait original)
  • lite cool whip
directions:
  1. Cut the dates into small pieces and place into a small bowl to soften with the coconut oil and the water.  While they soak grind the almonds in a food processor (coarse or fine, up to you).  Pour the ground almonds out into a medium bowl.
  2. Pour the date mixture into the food processor and puree.  Pour the mix out into the almond bowl and stir to combine with a wooden spoon.
  3. Preheat the oven to 325 degrees F and oil a mini muffin tin (24 muffin capacity).
  4. Grab crust pieces about half the size of your thumb and gently push into the base of each mini mold, then push up the sides evenly.
  5. Bake for 15 minutes, or until edges have darkened a bit.
  6. Remove from oven and let rest for 10 minutes before removing from the mold and letting cool completely on wire racks.
  7. Place crusts on a large plate or tray and gently spoon strawberry yogurt into the center of each tart.  Freeze the tarts.  
  8. Remove from the freeze and top each tart with a large dollop of lite cool whip.  Serve.


The crust recipe is a lightly edited version from Deliciously Ella.


Monday, July 6, 2015

mini tart cups


These mini tart cups are so cute and easy.  They are the perfect snack size, and can be made in so many flavors and varieties!  All you need is any sugar cookie, cracker, or shortbread dough that can be rolled out.  I used a biscuit cutter with a scalloped edge because it makes the tart edges prettier.


Gather up your favorite dough recipe (that can be rolled out), a muffin tin, and a biscuit cutter slightly bigger than the muffin tin base.

Roll out your dough fairly thin because it will puff up a bit when it bakes, and you want plenty of room for tart filling!  I should have rolled this batch a bit thinner, but they still worked fine.  Just don't roll your dough CRAZY thin, because you want the tart crust sturdy enough to support the weight of your filling.


Use your biscuit cutter and cut out the dough in slightly bigger circles than the bottom of the muffin tin openings.  Spray the muffin tin well with cooking spray before you lightly press the dough in and they'll pop out easily after they're baked.  Grab a fork and poke 3-4 times on the tart bottoms to prevent them from puffing up too much.


I baked this batch for 18 minutes, then let them sit for about 2 minutes before I removed the tart cups to a wire rack to cool completely.

You can easily make these a day before you need them if you store them in a cool dry place.  I made these ahead of time, and I made the custard filling the day before as well.  I piped the custard into the cups right before I needed them and topped them with strawberries and blueberries.  So easy!  I love these tarts.  They taste yummy (seriously, I need an intervention to stop eating them all!), they were really easy, you can make them in advance, and they look super fancy.


Tarts are great for parties because you can just grab them and you don't need a fork or even a plate.  I love grab and go foods!  I've already got a bunch of tart variations I want to make too.  One the top of my list?

  • shortbread cup + chocolate pudding + whipped cream dollop
  • graham cracker cup + chocolate ganache or pudding + toasted marshmallow
  • chocolate sugar cookie cup + strawberry Greek yogurt
  • sugar cookie cup + strawberries + whipped cream dollop
  • peanut butter cookie cup + Reese's peanut butter cup


mini tart cups

ingredients:

  • 2 cups AP flour
  • 2 tbsp sugar
  • 1 tsp salt
  • 1/2 butter, cut into small pieces
  • 1 egg
  • 3 tsp milk

directions:

  1. In a food processor, blend the flour, sugar, salt, and butter until it resembles coarse sand.   Pulse in the egg, then add in the milk and pulse until the dough comes together.
  2. Wrap the dough in plastic wrap and refrigerate for 30 minutes.
  3. Preheat the oven to 350 degrees F.  Flour you counter and roll on the dough fairly thin.  Use a biscuit cutter slightly larger than the muffin tin base and cut out your dough.  Gently press into the greased muffin tin and lightly stab 3-4 times with a fork.
  4. Bake for 18 minutes, until the edges are lightly golden.  Remove from the oven and let sit for 2 minutes before removing the cups onto a wire rack to cool completely.
  5. Once cooled, fill cups and serve, or set unfilled cups aside in airtight container in a cool dry area.  Cups can always be filled and served the next day.  Once filled try to consume the cups within 3 days or the cups will start becoming soggy on the inside.

Friday, May 29, 2015

homemade healthy fast food


We don't eat fast food very often.  It's usually a special treat, or a "well, we're already out of the house, starving, and have no food at home".  Of course you wouldn't know it by talking to Liam.  He acts like we go all the time, and will point out every "Donald's" location he sees.

I'm not really a fan of fried foods, and I try to make everyone happy with their food, so I thought I'd make some healthy versions of fast food instead.  I came up with


  • baked chicken nuggets
  • baked fries
  • chocolate covered strawberry shake (smoothie)

I used sweet potatoes for this recipe, they're just what I had on hand.  Russet potatoes or yams could be used instead.  Whatever you prefer.

Peel the potatoes and slice them up.  I like mine like steak fries.  Bonus if you cut them like steak fries because they take the same cooking time as the chicken so you can bake them for the same time.


Once the potatoes have been cut stick them into a freezer bag and season.  This makes the seasoning distribution so much more even.


I always let the kids shake the bag.  Next time I might have to video it.  They get really into it!


Classic breading station for the chicken.  Get a bowl each for flour, beaten egg, and seasoned breadcrumbs.  Work left to right covering fresh defrosted chicken pieces one at a time in the contents of each bowl.  Try to keep your fingers out of the contents as much as possible or you'll end up with "monster hands".  Liam thinks that part is hilarious.  Place the chicken pieces on a parchment covered baking sheet when they are ready.


 Once the potatoes and chicken are prepped, bake together at 375 degrees for 30 minutes.  If you want to you can broil them for 2 minutes at the end for extra crispiness.


This is one of Liam's favorite ways to have chicken.  I only make it this way occasionally.  I don't want him to get too used to the idea of "fast food style".  :)

You know how people say that a great way to get kids to eat healthy is for them to cook their own food?  Liam's hands down favorite chicken is when I give him carte blanche of my spice drawer and let him season a whole chicken breast for himself.  My little string bean will inhale the whole thing that way!  Crazy.


This meal all came about from a few days ago when we had NO groceries at home, we were doing a million errands around town, and Liam was being an angel (I know, right?).  I promised him I'd split a milkshake with him on our way home, but the closet McDonald's milkshake machine was broken.  Liam was devastated, so I told him I'd make him one at home.  He had his heart set on strawberry, and I figured that would be the easiest flavor to make healthy anyway... 


baked fries

ingredients:
  • 4 medium potatoes (russets, yams, or sweet potatoes)
  • 1 tbsp olive oil
  • 1/2 tsp salt
  • 1/4 tsp black pepper
  • 1/4 tsp garlic powder
  • 1/4 tsp oregano
directions:
  1. Preheat oven to 375 degrees F.  Peel potatoes and slice steak fry style
  2. place potatoes slices in freezer bag with oil and seasonings. Shake well.
  3. Place on a parchment lined baking sheet.  Bake 30 minutes.
  4. (optional) broil for 2 extra minutes for crispiness.

baked chicken nuggets

ingredients:
  • 3 defrosted chicken breasts, cut into pieces
  • 1 1/2 cups AP flour
  • 2 eggs, well whisked
  • 1 1/2 cups seasoned breadcrumbs (I like Italian seasonings)
  • 2 tbsp parmesan
  • 2 tbsp olive oil
  • garlic, salt, pepper, basil, chili powder to taste
directions:
  1. Preheat oven to 375 degrees F.  Set out 3 bowls in a row.  Left to right fill with flour, whisked eggs, and breadcrumbs with seasonings and olive oil.
  2. Have a parchment covered baking sheet set out in easy reach of the bowls.
  3. Quickly dredge chicken in the bowl contents left to right, keeping your fingers as clean as possible.  Place finished chicken on baking sheet.
  4. Bake for 30 minutes.  Outside should be golden.

chocolate covered strawberry "shake"

ingredients:
  • 12 oz. strawberry Greek yogurt
  • 3 tbsp unsweetened cocoa powder
  • 2 cups frozen strawberries
  • 1 cup milk
  • 1 tbsp honey (optional)
directions:
  1. Place all ingredients in blender and blend!  Pour and drink. Depending on the sweetness of the strawberries, honey may or may not be utilized.


Friday, May 22, 2015

peach frozen yogurt


I love the quick easy fix for dessert.  Who doesn't? Especially when its pretty darn guilt free.  Even better, its ready in less than 30 minutes.


All you need for this frozen yogurt is a tub of vanilla Greek yogurt and a 1 pound bag of frozen peaches.  I tend to keep extras of both in stock, so I can make this any time.  Woohoo!


Stick the whole tub worth of yogurt and the whole bag of peaches into the blender and puree.  If you want to set aside several peach slices to dice and mix in later, that's fine, but I prefer my frozen yogurt smooth.

I like my frozen yogurt a bit sweet, with the tangy tartness of barely sweetened yogurt, but if you're not used to that, or you want to splurge a little go ahead and add a tablespoon of sugar now.


Pour the mixture into a prepped ice cream maker.  My model can hold up to a quart and a half, and this makes that exactly.

I only needed to churn the frozen yogurt for 15 minutes until it was crazy thick.  At that point you could eat or freeze for later.


Freeze in a freezer safe container with a tightly fitting lid.  I like to freeze my yogurt for about an hour after churning so its really thick.  If you wait until the next day or so to eat set the frozen yogurt container on the container for several minutes before scooping.  It will be pretty hard.


This yogurt is great for kids because its a great sweet frozen treat for hot weather and isn't full of extra sugar.

My goal is to try every fruit flavor I can think of by the end of the summer.  I'm thinking maybe cherry or raspberry next... yum!


Peach Frozen Yogurt
makes 1 1/2 quarts
20 minutes total time

Ingredients:

  • 1 tub of vanilla Greek yogurt (preferably non-fat)
  • 1 pound bag frozen peaches
  • 1 tbsp sugar (optional)
Directions:
  1. Empty the full containers of yogurt and peaches (and sugar) into a blender and puree.
  2. Pour mixture into a prepped ice cream maker and churn 15 minutes.
  3. Eat directly or scoop into a freezer safe container with a tight lid.

Thursday, August 28, 2014

wake-up smoothie


Liam is a smoothie addict.  I'm pretty sure that he would eat all his meals in smoothie form if we let him.  I figure if I'm already making a smoothie for him I might as well make enough for everyone.  Between me getting bored quickly using the same recipe all the time, and my available ingredients always changing I am always looking for new smoothie ideas.

This recipe was adapted from one I found on the Self magazine web site.  They have some great ideas, but I usually have to alter them a bit until I get them how I want them.

I really do not think of myself as a hippie, so I had to laugh a bit at this smoothie recipe.  It calls for both almond milk and chia seeds, both things I currently had on hand.  I had some almond milk on my freezer left over from the last time I made it here.  Almond milk freezes really well.  If you don't have any, that's fine.  Just use regular milk.

I totally forgot to take pictures of the process, but really it's a smoothie.  How many photos can you really take of a few ingredients sitting in front of a blender?

The kids (and I!) loved this smoothie.  It wasn't too sweet, but you couldn't taste the carrot-y vegetable taste.  Both kids sucked theirs down in a second and Liam tried to beg seconds.  I probably could have made a second batch without worrying about it going to waste.  Considering I only got to drink a third of this, it was pretty filling too!


This might be the quietest they have every been while awake and in the same room.


Note to self: it is difficult to take a photo of yourself holding a smoothie plus two wiggly boys.  And brush your hair first!


print recipe

wake-up smoothie
a delicious fruit and vegetable smoothie that will keep you filled up all morning.
Ingredients
  • 1 cup low-fat vanilla yogurt
  • 8 oz can pineapple chunks including juice
  • 1/2 cup unsweetened almond milk
  • 1 carrot
  • 1 banana
  • 1 tbsp chia seeds
Instructions
1. Throw all the ingredients in a blender together. Turn on high and leave on for about 2 minutes, until everything is pureed. Pour into glasses and drink immediately. If your blender isn't very strong cut up the carrot before blending to help.

Details
Prep time:
Cook time:
Total time:

Yield: 1-3 servings

Saturday, July 26, 2014

breakfast bread


I am aware of the total mind-numbing vagueness of the title of this recipe.  Sorry about that.  I really don't know what to call it because

  1. I'm terrible at names
  2. this was originally supposed to be coffee cake before I altered it almost completely and now I don't know what it is exactly
Let's just say it's closer to say, banana bread (but with no bananas) than it is to coffee cake.  Okay?

I was going to make the coffee cake from Jessica Seinfield's cookbook Deceptively Delicious, but then I realized I was out of a bunch of the ingredients, and from then I ended up just adding bits of things, and changing times, and temperatures... and it ended up being breakfast bread instead of coffee cake.

A note about Jessica Seinfield's book:  I am a fan of it for the sole reason that I figure I might as well get the most nutrients possible out of the food I eat, so why not add additional produce in the form of purees?  You can't taste it.  If I'm dead set on eating brownies, I might as well eat brownies with spinach and carrots in them.  I know it sounds gross, but really, they are pretty darn good!  I don't add the produce purees into food to trick my kids into eating veggies.  They both love them anyway, and I want them to KNOW they are eating fruits and veggies from the get-go.

Tangent over.  I swear.


I didn't include pre-baking photos because I forgot, and frankly all you do is dump all the ingredients into a bowl and mix them until just incorporated.  Simple, no photo needed.


This photo and the next are utterly horrible (of me), but I had to include them because of the story.  I had just taken the bread out of the oven when Liam grabbed my camera and volunteered to take "the photo of the food".  Guess I take a lot of photos of food that he's picked up on that... These photos are also the first two Liam has ever taken.


Seriously, Liam put the camera right up to his eye even though my camera doesn't have a view finder.  It was so cute!


Moist and flavorful.  Yum.  The butternut squash reminds me of pumpkin.  Full of sweetness.


print recipe

breakfast bread
A sweet cake-y breakfast bread
Ingredients
  • 1 cup brown sugar, packed
  • 4 tbsp butter, softened
  • 1 1/4 cups skim milk
  • 1/2 cup non-fat plain yogurt
  • 1/2 cup unsweetened applesauce
  • 1 cup oats
  • 1 large egg
  • 2 tsp vanilla extract
  • 2 cups whole wheat flour
  • 2 tsp baking powder
  • 2 tsp cinnamon
  • 1/2 tsp salt
  • 1 cup butternut squash puree
Instructions
1. Preheat the oven to 375 degrees F. Spray an 8x8 baking dish with cooking spray. In a large bowl mix all the ingredients together until just incorporated. 2. Bake for 45-55 minutes, or until a toothpick comes out clean. Eat warm or cool. Store in an airtight container in the fridge for up to a week.
Details
Prep time: Cook time: Total time: Yield: 8x8 pan

Monday, June 23, 2014

chocolate overnight oatmeal


Try this.  You will thank me.  I guarantee.  If you like breakfast that tastes like dessert, this will be your new favorite.  I LOVE sweet breakfasts.  They taste delicious, but tend to be far to high in sugar, and far too low in protein.  This solves those issues.

This is sweet with great texture, and is easy to eat on the go.  Even better, it takes 5 minutes to make with no prep needed, and you've made three breakfasts (one batch equals three servings).

Fantastic, right?  Seriously, I have yet to see a down side to this recipe.  This texture alone is heaven.  Thick like pudding, and though I originally thought the oatmeal chunks might taste strange, they actually taste like little pieces of melting chocolate.  Don't know how that's possible, but it is delicious.  Seriously.

Note:  I do try to list recipes that require only standard ingredients that you'd probably have at home anyway.  This recipe uses protein powder, but trust me, if you don't have any already this recipe alone is worth getting some.  There are many other uses for protein powder too, so don't shy away from trying some.

Did I forget to mention that an 8 ounce jar full of this oatmeal is less than 300 calories and almost 20 grams of protein?  Yeah.  You heard me.


This all started when I was looking up new healthy breakfast ideas because I get bored so quickly eating the same old things.  I kept seeing recipes for overnight oatmeal.  It sounded weird at first, but I decided at make a chocolate version.  I'm so glad I did!


 This recipe perfectly fills three 8 ounce mason jars.


 I'm now even going to show photos of the process because honestly, it'd just be a photo of a bowl with this same oatmeal mix in it.  All you do is dump all the ingredients into a bowl and mix until evenly incorporated.  It is really that fast and easy.


Fresh out of the fridge the next morning.  Cold and refreshing.  And full of chocolately goodness!


print recipe

chocolate overnight oatmeal
Sweet and healthy overnight oatmeal full of chocolately goodness.
Ingredients
  • 1 cup skim milk
  • 1/2 cup low-fat vanilla yogurt
  • 2 tbsp cocoa powder
  • 1 cup old-fashioned oats
  • 3/4 cup chocolate protein powder
Instructions
1. Add all ingredients into a bowl and mix thoroughly. Pour into 3 8oz. mason jars and cover. Store overnight in the fridge. Eat cold straight from the fridge. Enjoy!
Details
Prep time: Cook time: Total time: Yield: 3 8oz. mason jars