Showing posts with label Liam. Show all posts

Sunday, February 14, 2016

one of my favorite Valentines

I am lucky enough to have three awesome guys as my Valentines.  Liam is my favorite guy to help out in the kitchen, he is always so inquisitive and willing to help ...and he's usually the one trying to make me agree to bake (no arguments here!).

For Christmas I got him a cute chef hat for him to decorate and wear while cooking.  He decided to put his name and a heart on the hat.  My favorite thing ever is why he put the heart on his hat.


Have a good holiday weekend everyone!  Go eat too much chocolate!  :)

Thursday, November 19, 2015

cooking with kids

Anything whose met Liam should know how hard it is to get a picture of him standing still and smiling.  This is literally as good as I could get.

I love cooking with Liam.  I love being able to teach him something useful and yummy, while spending time with him.  I know he loves it because I let him pick what we make... we make lots of cookies  :)

Honestly, it only takes a little bit more time to cook with you kids than it does to cook by yourself, unless you kid is in a crazy distructo mode (like flinging flour ALL OVER THE COUNTER).

Don't believe me?  Here are a few pros to teaching your kids to cook:

  • kids are more likely to eat food they helped make
  • teaches them confidence
  • helps math skills
  • inspire creativity with new flavor combinations
  • learn kitchen safety young
  • more exposure to new foods
  • don't allow your kid to go off to college only knowing how to make toast
  • fun bonding time

I love Wednesdays.  That's the day that my Mom takes Jack for a while and I get some one on one time with Liam.  We can do whatever, but he likes to cook with me.  Mostly because he wants cookies, and he thrives on routine.

This week was chicken for lunch, plus funfetti sugar cookies.

Liam loves chicken, especially breaded baked nugget style.  If he's really hungry though he'll make a seasoned baked breast.  It's faster to make, and if I let him season it himself he eats more of it.  Liam LOVES seasoning his own food.  It means he gets to open all the spice jars and sniff them before picking out which ones he wants.  His favorites are always basil and lavender (luckily not together).  He's really good at picking combos.  Yesterday's chicken was salt, pepper, seasoned salt, garlic, oregano, basil, paprika, and olive oil.  Just a pinch of each, then baked at 375 degrees F for about 40 minutes.  Served with a side of baked potato pieces and garbanzo beans.  Liam's favorite.

decorated by Liam

After lunch it was time for cookies!  I have a HUGE bag full of super fun shaped cookie cutters, which I let Liam go through to pick out a few for the cookies.  He picked a circle.  Seriously.  He did cave and decide to use the fluted circle edge instead of the smooth edge though.  Sometimes I can't decide if Liam is horribly unimaginative with desserts, or just enjoys the fancy classic styles.  Once the cookies baked and cooled Liam decided the frosting should be "the color of Fluttershy's skin".  Okay, light yellow is it.  Yeah, you know you're a parent when you know the colors of all the My Little Ponies.  We jazzed them up with rainbow sprinkles, and Liam's cookie even got sugar eyeballs. 

 
Cooking with kids can be a bit messy, but so rewarding, and I can't recommend it enough.  Even if you are only making peanut butter sandwiches together, try cooking with your kids today.  :)

Saturday, November 14, 2015

caramel apple tart


Doesn't this tart look yummy?  Is it.  So simple, yet amazing good.  Want to know a secret?  It was made entirely by a 4 year old.  MY four year old, Liam.  Not bad, huh?

I've gotta say, it made me get all warm and fuzzy inside yesterday when he told me he wanted a tart pan for Christmas for himself so we could make more tarts together.


Confused by the round caramel balls as opposed to a pretty drizzle?  I saw the bag of Kraft caramel balls at the store and just HAD to try them, I would have melted them down and drizzled the caramel over the tart, but since Liam made this himself I thought it would be simpler (and not quite so hot) for him to just dump them over top of the apple slices.

I still have lots of caramel left in the bag, and I can't wait to use them, so sorry in advance if I have a plethora of caramel related recipes soon!


I love baking with Liam.  We don't get to do it all the time, mostly because Jack wants to help too and 2 isn't quite old enough to be of much help.  When Jack is out of the house I take full advantage of my cute kiddo baking time!  As soon as I asked Liam if he wanted to bake a tart he ran over and immediately grabbed his apron, which made me so happy, because he hadn't used it in a while and he could have legitimately forgotten about it.


I'm trying something new starting with this post.  I have a you tube channel that I'm going to put the occasional post on.  I figure some people might prefer video over reading or whatever, and when I do post a video I'll make sure to link it up with the corresponding recipe.  I'm still very new at making cooking videos, and the video for this recipe is just awful, but cute.  It's my first cooking video, starring a 4 year old, with me helping a bit plus filming, with bad lighting, a messy kitchen, etc.  If you do watch the video make sure your sound is up because Liam is much quieter than me, but he says some cute funny things.


Okay, I really don't have much else to say other than list the recipe, but this photos look so pretty, I just had to post them.  :)


This tart really makes 6 servings, I just started cutting too big and ended up with 5 huge slices instead.  Aim for 6 slices.


As you can see, we left the apple peels on.  I wanted Liam to make as much of the tart as possible by himself, and I thought peeling might be a bit above him.  Also, I like the added color and look of a tart with the peels.  You can peel the apples first if you like.

Slicing the apples and helping Liam spread the dough into the tart pan are really the only things I helped with.  Liam seriously did the rest by himself.  Liam wasn't quite up to cutting the apples.  He either tried to hack them into weird huge chunks, of he keep trying to put his fingers too close to the blade.  Don't worry, I paid VERY close attention when he handled a knife.  I even tried to have him use a curved mincing knife for a while because I thought it might be easier for him to hold that handle, but no.


watch Liam bakes a caramel apple tart on my new you tube channel.


  • Caramel Apple Tart
makes 6 servings

Ingredients:

1 1/2 cups AP flour
1/3 cup granulated sugar
1/4 tsp salt
8 tbsp (1 stick) cold unsalted butter, cut into small cubes
1 egg
1 tsp vanilla extract
2 tbsp cold water

2 fuji apples, sliced thinly (peels optional)
2 tbsp caramel balls


Directions:
  1. Combine the flour, sugar, salt, and butter in a food processor until the butter is in tiny crumbles.  Add the egg and vanilla and mix until absorbed.  Slowly pour in the water through the processor lid while mixing.  The dough should be soft but not sticky.  Wrap the dough in plastic and refrigerate for 30 minutes.
  2. Preheat the oven to 375 degrees F.  Lightly spray the tart pan with cooking spray.  Gently push the dough into place in the pan.  Spread it out evenly.  Cover the dough evenly and thoroughly with the apple slices.  You will probably not need all the slices.  
  3. Either dump the caramel balls over top the apples and bake for 45 minutes, let cool, and eat.  OR  bake the tart without the caramel.  While the baked tart cools heat the caramel balls evenly in a microwave, then drizzle the caramel sauce over the tart.  Enjoy!
Note: Makes enough dough for one 9 1/2-inch tart, six 4-inch tartlets, twelve 2-inch miniature tartlets or one 13 3/4-by-4 1/4-inch rectangular tart.


Tuesday, October 20, 2015

DIY "The Incredibles" family costumes


Okay, this photo is a little fuzzy (camera phone), and we aren't all wearing our cool masks, but this is probably the best full shot of all of us.  Gotta love family costumes.  Plus, come on, it's cute when the 3 year old is the one picking out our costume theme.


This was an easy ensemble to make.  I bought Liam's full costume and Jeff's shirt because they were easy to find and super cheap on sale (whoop whoop!).  I bought a red shirt for me and a red onesie for Jack and made the two necessary logos in felt, then hand stitched them on.


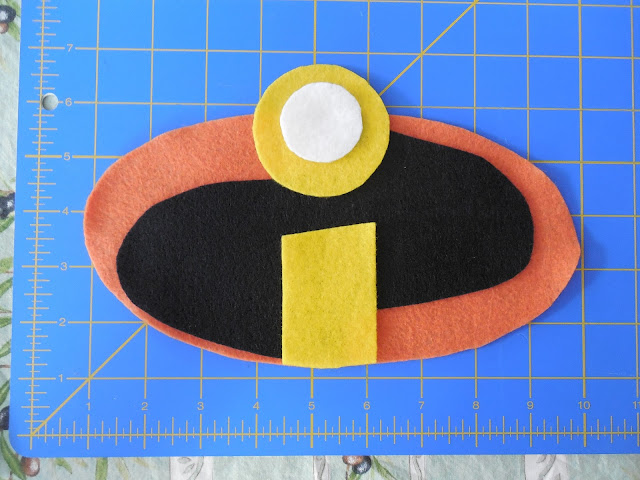
Not bad for eyeballing a logo and cutting it out in felt.  I found all the colors of felt I needed easily at Joann fabric.


Find a picture of the logo and eyeball it, cut out all your pieces, then stitch together.  It didn't take very long.


Step one: the large orange oval.


Step two: add the black over top and center.


Step three: add the yellow portion of the "I".


Step four: add the white portion of the "I".


Repeat as needed for multiple logos.  Stitch individual logo sections on in matching colored thread.


Sew the logo onto the top (onesie).


If sewing onto a women's top, keep in mind any stretch needed.  You might want to pin the logo onto the shirt while on a dress form (large pillow, etc.) to keep the correct stretch before sewing.


Grab the rest of your costume.  I used my newly logo-ed shirt, red leggings, black bike shorts, an orange spandex belt (I made this quickly with some fabric I bought), and a black mask.


Jack's hair had started going crazy by this picture (obviously), but we just had to be the Incredibles while our Jack Jack was still a baby.


This is the miracle photo, Liam actually posing!  This NEVER happens. He was just so happy to be The Incredibles, probably because he's the human embodiment of Dash.


This was a fun family costume to do, quick, easy, and cheap to make, and made it very easy to keep track of each other trick or treating (RED!).  Hopefully this can be of help to you.

Happy Halloween and costuming making!

Sunday, June 21, 2015

Happy Father's Day!

Happy Father's Day!  This is just a brief shout out to all the awesome dads out there.  I hope you are all having a very relaxing and fun day with your families.

I just had to add this "proud Mommy" moment from earlier today.  I reminded Liam this morning that today was Father's Day.  His reaction was to run up to Jeff, hug him and tell him "I love you!"  Then Liam turned to me and insisted that Jeff needed cookies.  Chocolate chip cookies.  He knows they're Jeff's favorites (and figured he'd get a cookie or two out of the deal I'll bet!).  Liam insisted on making the cookies himself.  All I did was help measure, add the egg (we had spillage the first try when he did it himself), and handle the oven.   Liam did the rest all by himself.  And darn it if I can't stop eating them!  I love how sweet this kid is, and how freaking awesome he is in the kitchen!

Because Jeff is totally awesome I was already planning on making a good dessert, but the kiddo stole the show a bit, so I'll make my dessert later.  I'll post it soon, don't worry.   :)
Seriously though, he could have been relaxing and doing whatever he wanted today, and Jeff beautified the whole front yard AND cleaned out the garage!  Extra credit goes to him.

Happy Father's Day everyone!


Not bad for cookies made by a 4 year old, huh?

Liam used my favorite chocolate chip cookie recipe, which can be found here.

Friday, June 12, 2015

pasta and garbanzo bean soup


I totally love this soup!  Not only is it really easy and healthy, but its super kid friendly (Liam's favorite soups all have pasta and beans), but you can make part of it ahead of time!

I made the first half of the recipe while the kids were napping and I had some free time.  Then the boys and I went swimming, and when we got home I only had about 15 minutes of cooking before it was all ready.  No fuss, little mess, healthy and filling.  Jeff and the boys loved this soup, and one bowl (plus a few pieces of obligatory "soup bread" to dip) was very filling.

If you're looking at the soup and wondering how it could be so healthy, look no further.  The soup is full of veggies!  I roasted and pureed them before stirring them into the chicken broth (low-sodium of course).  That made the broth thick, flavorful, and creamy.


I roasted a pan of carrots, red bell pepper, and cauliflower with a bit of olive oil, salt, and pepper until the tops were golden and fragrant, then I pureed the veggies with some of the chicken broth.  I did all this ahead of time and then stuck the liquid in the fridge until I was ready the finish the soup.  You could make the soup all in one go if you want to though.


I just love the bright orange color!  The cauliflower and bit of olive oil really help thicken the soup and make the broth creamy.  I swear, it tasted so luscious, like I was eating some super fatty, but HA-HA!  I was only eating veggies. Yay for taste bud deception.  :)

I wanted a mostly pureed soup because I was going for simplicity.  A lot of my soups are massively chunky and busy, and I wanted something simple.  Plus, Liam loves veggies, but he doesn't always enjoy them in large chunks in his soup.  He'd rather have the flavor of them, and actually be able to see the pasta in the soup.

I like my soup to be pretty thick, and this soup thickens more the next day (looking almost like a very cheddar-y mac and cheese), so feel free to adjust the amount of broth used accordingly.


pasta and garbanzo bean soup
serves 6

ingredients:
  • 1 tbsp olive oil
  • 1/2 head of cauliflower, cut into pieces
  • 8 carrots, sliced
  • 1 large red bell pepper, de-seeded and cut into large pieces
  • 1/2 tsp salt
  • 1/2 tsp pepper
  • 2 cloves of garlic
  • 4 cups low-sodium chicken broth (add more if you prefer thinner soup)
  • 2 15 oz. cans garbanzo beans, rinsed and drained
  • 1 1/2 cups small pasta
  • 1/2 tsp basil
  • 1/2 tsp oregano
  • 1/2 tsp chili powder
directions:
  1. Preheat oven to 375 degrees F.  Cut up cauliflower, carrots, and bell pepper and place as flat as possible on a parchment lined baking sheet with the garlic.  Drizzle with olive oil, salt, and pepper.  Bake for 40 minutes.  
  2. Slide veggies off the parchment and into a blender.  Add chicken broth and puree.  At this point you can store the puree in the fridge for later use, or pour the puree start into a pot on the stove.
  3. Bring liquid to a boil, reduce to a simmer and add the pasta, garbanzo beans, basil, oregano, and chili powder.  Stir occasionally.  As soon as the pasta is al dente the soup is ready.  Serve with french bread to dip.
note: feel free to add more chicken broth if you prefer a thinner soup.  You might want to have some extra broth on hand for leftover soup, as it will thicken the next day in the fridge.

Friday, May 29, 2015

homemade healthy fast food


We don't eat fast food very often.  It's usually a special treat, or a "well, we're already out of the house, starving, and have no food at home".  Of course you wouldn't know it by talking to Liam.  He acts like we go all the time, and will point out every "Donald's" location he sees.

I'm not really a fan of fried foods, and I try to make everyone happy with their food, so I thought I'd make some healthy versions of fast food instead.  I came up with


  • baked chicken nuggets
  • baked fries
  • chocolate covered strawberry shake (smoothie)

I used sweet potatoes for this recipe, they're just what I had on hand.  Russet potatoes or yams could be used instead.  Whatever you prefer.

Peel the potatoes and slice them up.  I like mine like steak fries.  Bonus if you cut them like steak fries because they take the same cooking time as the chicken so you can bake them for the same time.


Once the potatoes have been cut stick them into a freezer bag and season.  This makes the seasoning distribution so much more even.


I always let the kids shake the bag.  Next time I might have to video it.  They get really into it!


Classic breading station for the chicken.  Get a bowl each for flour, beaten egg, and seasoned breadcrumbs.  Work left to right covering fresh defrosted chicken pieces one at a time in the contents of each bowl.  Try to keep your fingers out of the contents as much as possible or you'll end up with "monster hands".  Liam thinks that part is hilarious.  Place the chicken pieces on a parchment covered baking sheet when they are ready.


 Once the potatoes and chicken are prepped, bake together at 375 degrees for 30 minutes.  If you want to you can broil them for 2 minutes at the end for extra crispiness.


This is one of Liam's favorite ways to have chicken.  I only make it this way occasionally.  I don't want him to get too used to the idea of "fast food style".  :)

You know how people say that a great way to get kids to eat healthy is for them to cook their own food?  Liam's hands down favorite chicken is when I give him carte blanche of my spice drawer and let him season a whole chicken breast for himself.  My little string bean will inhale the whole thing that way!  Crazy.


This meal all came about from a few days ago when we had NO groceries at home, we were doing a million errands around town, and Liam was being an angel (I know, right?).  I promised him I'd split a milkshake with him on our way home, but the closet McDonald's milkshake machine was broken.  Liam was devastated, so I told him I'd make him one at home.  He had his heart set on strawberry, and I figured that would be the easiest flavor to make healthy anyway... 


baked fries

ingredients:
  • 4 medium potatoes (russets, yams, or sweet potatoes)
  • 1 tbsp olive oil
  • 1/2 tsp salt
  • 1/4 tsp black pepper
  • 1/4 tsp garlic powder
  • 1/4 tsp oregano
directions:
  1. Preheat oven to 375 degrees F.  Peel potatoes and slice steak fry style
  2. place potatoes slices in freezer bag with oil and seasonings. Shake well.
  3. Place on a parchment lined baking sheet.  Bake 30 minutes.
  4. (optional) broil for 2 extra minutes for crispiness.

baked chicken nuggets

ingredients:
  • 3 defrosted chicken breasts, cut into pieces
  • 1 1/2 cups AP flour
  • 2 eggs, well whisked
  • 1 1/2 cups seasoned breadcrumbs (I like Italian seasonings)
  • 2 tbsp parmesan
  • 2 tbsp olive oil
  • garlic, salt, pepper, basil, chili powder to taste
directions:
  1. Preheat oven to 375 degrees F.  Set out 3 bowls in a row.  Left to right fill with flour, whisked eggs, and breadcrumbs with seasonings and olive oil.
  2. Have a parchment covered baking sheet set out in easy reach of the bowls.
  3. Quickly dredge chicken in the bowl contents left to right, keeping your fingers as clean as possible.  Place finished chicken on baking sheet.
  4. Bake for 30 minutes.  Outside should be golden.

chocolate covered strawberry "shake"

ingredients:
  • 12 oz. strawberry Greek yogurt
  • 3 tbsp unsweetened cocoa powder
  • 2 cups frozen strawberries
  • 1 cup milk
  • 1 tbsp honey (optional)
directions:
  1. Place all ingredients in blender and blend!  Pour and drink. Depending on the sweetness of the strawberries, honey may or may not be utilized.


Friday, May 1, 2015

honeydew popsicles


I love Food Network.  It's the only show I miss after we cancelled our cable.  Luckily for me I have a subscription to Food Network magazine.  Yay!  Most of the recipes are pretty normal, but every once in a while I see one that I think is SO weird it can't possible taste good.  And so of course I have to try it out for myself.

I found a recipe in my most recent issue for several fruit sauces to top cheesecake.  Most of them looked pretty innocuous, but one for a honeydew-avocado sauce stood out.  The ingredients were few and the directions were speedy and straightforward.  I even had both a small honeydew and an avocado sitting out that I didn't know what to do with.  What had I got to loose?

I made the sauce easily just out of curiosity (I didn't have any cheesecake, but I thought I could maybe freeze the sauce until I made one).  It was a hot day, and the sauce seemed thick, sweet and juicy.  I immediately thought POPSICLES!  I was able to make 10 popsicles out of the sauce, and Liam loves them!  He keeps asking for more every day.  We have a strict one popsicle a day rule at our house, so he's got enough for a few more days.  I tried to take a photo of him smiling while eating one (he really likes them, I swear!) but between him being a bit of a serious kid and him eating his popsicle very seriously, I couldn't get the photo I wanted.

Why do I call these "honeydew popsicles" and leave the avocado out of the title?  Well, partially because you can't taste the avocado in them (speaking as a person who HATES them) they just help the popsicles become thicker and creamier, and partially because I don't want the title to scare people away from a good thing.  Try them.  You'll thank me!  And Food Network Magazine.


Honeydew-Acocado Popsicles
(recipe by Food Network magazine, frozen by me)

Ingredients:

  • 2 cups cubed honeydew melon
  • 1 small avocado (peeled and pitted)
  • 1/3 cup sugar
  • juice of 1 lime
Directions:
  1. Puree all ingredients together until smooth.If sauce is still lumpy, strain through a fine-mesh sieve with a ladle.  Pour into popsicle molds and freeze at least 2 hours.  
note: makes about 10 popsicles depending on the size of your molds.  Recipe makes 1 3/4 cups

Monday, April 20, 2015

Mickey Mouse birthday treats


I'm still in denial that my baby is already 4.  I seriously don't know how that happened so fast!  This kiddo is a total Disney fanatic.  Wonder why with parents like us?  :)  This is the second time he's insisted on a Mickey Mouse themed birthday party.  I already had most of the decorations, so I thought, why not?

Throwing a birthday party so close to Easter always messes me up because there is just so much going on every spring!  As usual, I realized at the last second that I had not a clue what to make (food wise) for Liam's birthday party.  Liam requested Mickey Mouse cupcakes.  Other than get Mickey patterned cupcake wrappers I couldn't think of how to make a Mickey cupcake.  Finally I decided on Mickey head toppers over the frosting.  They turned out okay too.


These were really easy and quick to make.  I printed out a sheet of paper with 15 Mickey head outlines on it and covered the paper with a large piece of wax paper. I filled a freezer bag with half a bag brown melting candy. I know they don't taste as good as real chocolate, but they are so much easier to melt, and keep at the desired consistency.  I microwaved the bag for a few minutes (checking and squishing occasionally), then took it out, cut a tiny very small hole in one corner, and used the bag like a piping bag.  I just traced the Mickey outline and filled it in.

I filled in the first 15 Mickeys and just slid the bottom outlines over to an empty section of wax paper and made more.

Note:  The melting candy should be easy to handle, and be warm, not too hot.  You need to keep moving and fill in the Mickeys quickly because the candy will want to keep coming out.  Also, you don't want to wait too long and have it firm up too much before you finish.  It is really easy if you get a good rhythm going.


Let the Mickey heads cool.  It shouldn't take long if you're in a hurry.  Pick them up off the wax paper and stick them on top of the cupcake frosting.  Unless you've made your Mickeys crazy thin they should pop off the wax paper very easily.


I thought I had a Mickey Mouse cookie cutter until the day before the party.  Oops!  Instead of Mickey shapes I decided to go super simple and make round Mickey cookies.  They're a bit sloppy, but I made about a million of them and started to get really tired.  They are yummy though, so I really don't mind the leftovers.  :)  The royal icing recipe is available here.  I wrapped these cookies up in stead of giving out goodie bags.  No one ever seems to play with goodie bag contents anyway, and who doesn't love cookies?


Liam was so excited by all the Mickey things around our house, and playing with friends.


Last year I stumbled across a site that had a great idea.  Every year starting at about age 3 give your child a questionnaire.  The same questions every year, and you can compare the answers.  Such a great idea!  Last year Liam refused to answer at least half of the questions, but this year he actually responded to all of them.  I was pretty amazed.  His answers were pretty cute too.

I got this idea from reaves party of three if anyone wants to check it out.  He are Liam's responses:

1. What is your favorite color? red
2. What is your favorite toy? trains
3. What is your favorite fruit? strawberries
4. What is your favorite tv show? Phineas & Ferb
5. What is your favorite thing to eat for lunch? Preschool lunch
6. What is your favorite outfit? My red shirt
7. What is your favorite game? Candyland
8. What is your favorite snack? Fig bars
9. What is your favorite animal? platypus
10. What is your favorite song? Twinkle twinkle little star
11. What is your favorite book? Goodnight moon & Biscuit series
12. Who is your best friend? Preschool friends
13. What is your favorite cereal? Daddy's cereal (whatever he's eating, mostly wheat bran)
14. What is your favorite thing to do outside? Play games
15. What is your favorite drink? Boy soda ( the only “soda” I give him is carbonated water with a bit of lemon juice in it, but I can't think of what else he's talking about.)
16. What is your favorite holiday? Christmas!
17. What do you like to take to bed with you at night? My blankets and a book
18. What is your favorite thing to eat for breakfast? A fig bar (wishful thinking!)
19. What do you want for dinner on your birthday? cupcakes
20. What do you want to be when you grow up? A Daddy!


Yes, even our hard hats are Mickey!