Showing posts with label chocolate. Show all posts

Saturday, February 13, 2016

nothing says Valentine's Day like bacon and chocolate!


Yeah, that's right.  A chocolate bacon bar.  What says's "I love you" like chocolate and bacon?  

If you need last minute ideas for Valentine's Day, or just really want to keep these all to yourself, this recipe is easy and yummy.  Being a vegetarian I haven't tried them myself, but Jeff ate half the batch in a day, so they must be good!


Be prepared for gratuitous chocolate photos.  They were just so pretty!  I couldn't narrow it down.  :)


 These chocolates are great.  All you really need is bacon and chocolate chips.


Start by laying 5 strips of bacon on a foil lined lipped baking sheet.  If you want to infuse some extra sweetness you can brush two teaspoons of maple syrup over the bacon.  Bake at 400 degrees F for 10-15 minutes until cooked but not crispy.  I baked mine for 12.  Take the bacon out and let it cool for a few minutes.  Dice the bacon as small as you can and place it on clean foil on the same baking sheet.  Bake for 2-5 minutes until its a bit crispy.  Remove from the baking sheet and place on a plate lined with paper towels.


While the bacon is cooling get out a small double boiler and slowly melt 2 cups of chocolate chips until smooth and shiny.  You can use whatever shape molds you want (these are silicone cupcake sized molds).  Make sure the mold interiors are clean and completely dry.  Spread a thin layer of chocolate on the mold bottoms to insure the candy tops are flat and clean when they're finished.


Mix the bacon into the melted chocolate and evenly pour into the molds.  I filled my molds 1/3 of the way up and they were pretty thick.  I made 9 chocolates, but you could make up to 12 without them being too thin.  Firmly tap the molds on the counter a few times to get rid of any possible air bubbles and to make sure the chocolates lay flat.  Let the chocolate sit out for a few hours to harden completely.  


When the chocolate is firm gently remove them from the molds.  They could be finished at this point, or you could decorate them like I did.  I used 1/4 cup of red candy melts to decorate.  These are pretty easy to use.  Put your candy melts into an uncut piping bag, or a sandwich bag and microwave upright in a plastic cup for 30 seconds at a time until evenly melted.  Snip a small hole in the bag tip.

Lay the chocolates out on parchment paper and very quickly create a pattern on the chocolates.  Let them dry.

Once the candy melt decorations have dried pick up the chocolate and snap off any small pieces hanging off.

Enjoy! Try not to eat them all in one day.


Chocolate Bacon Bars

Ingredients:

  • 5 strips of bacon
  • 2 teaspoons maple syrup (optional)
  • 2 Cups semi-sweet chocolate chips
  • 1/4 Cup red candy melts (optional)
Directions:
  1. Preheat oven to 400 degrees F. Lay bacon out on foil lined lipped baking sheet.  Optionally brush bacon with maple syrup. Bake for 10-15 minutes until bacon is cooked but not crispy.
  2. Dice bacon finely and return to oven on clean foil lined baking sheet for 2-5 minutes, until crispy but not burnt.
  3. Let bacon cool on paper towel covered plate.
  4. Prep a double boiler and slowly melt the chocolate chips until smooth and shiny.
  5. Spread a thin layer of chocolate on the mold bottoms, then mix the bacon into the chocolate mix and evenly pour into the molds, about 1/3 of the way to the tops.
  6. Tap the molds on the counter to remove possible air bubbles and flatten the chocolate.  Let dry completely. 
  7. Optional decoration: lay solid chocolate on parchment paper.  Put the candy melts into an uncut piping bag or sandwich bag and microwave upright in a plastic cup for 30 second intervals until melted evenly.  Snip a small hole in the bag tip and very quickly drizzle a pattern onto the chocolates.  Let dry.  Pick off any small bits of candy hanging off the chocolate bars.  Enjoy!


Thursday, February 4, 2016

Chocolate Pudding


I love chocolate pudding.  It's such a good comfort food.  Jeff loves chocolate too.  Some nights if I haven't made a dessert he will just grab a prep bowl full of chocolate chips.

This recipe is great.  It takes just a few minutes to make and only uses a handful of ingredients.  I can make it quickly during nap time and by dinner time its firm and ready to eat.  You can ever prepare it a day in advance if you want too (or have dessert for two people two nights in a row...)


I always put a huge dollop of whipped cream on top of my pudding.  Homemade is great if you've got the time, other days its cool whip all the way.  Sprinkles are good too!


Chocolate Pudding
serves 4

Ingredients:

  • 2 1/3 cups milk (I used 2%)
  • 2 1/4 teaspoons (1 packet) unflavored gelatin
  • 1/4 cup granulated sugar
  • 2/3 cup chocolate chips
Directions:
  1. In a pot off the heat stir together the gelatin and 1/3 cup of milk and let sit for a minute until the gelatin has been dissolved.
  2. Turn the heat to medium and stir in the sugar and remaining 2 cups of milk.  Once the sugar has dissolved and steam is starting to rise, turn the heat off and slowly stir in the chocolate chips until they have dissolved.  Pour the pudding into 4 containers and refrigerate for at least 4 hours.
Note: Make sure you pour the pudding into heat safe containers or let the pudding cool a bit in the pan before pouring.  Nothing sucks more than pouring hot pudding into a delicate glass and hearing loud cracks happen.  Ack!

Wednesday, February 3, 2016

PSA! Chocolate mint tea. Yeah, that's right.

Harney & Sons HT Blend Chocolate Mint Tea Sachets 20ct


I am in no way getting paid for this.  I just have to share.  I thought I'd try a new tea today and I found a box (so pretty!) of Harney & Sons Chocolate Mint Tea.  You can find the website here.

Sometimes I just desperately need chocolate.  This teas was such a better option than say the calorie bomb of a hot chocolate.  I got all the yummy chocolate scent and flavor I needed, a nice warm up in my freezing house, and no regret of too much dairy, or too many calories.  This is my new go-to treat tea I think.  If you are one of the few people (like Jeff) who doesn't like the combo of chocolate and mint then I'm sorry because you are missing out.  And you're also crazy.  Just sayin'...

Plus, the tea comes in a pretty metal tin, and I always need storage containers.

I found this tea at Target (and even saved a bit using Cartwheel.  Score.).  I've seen it on Amazon too, but it costs a lot more there.  Weird.

Anyway, take my word for it and try this yummy tea.  Seriously, I would wear this stuff as a perfume if I could.  Yum.

Friday, October 30, 2015

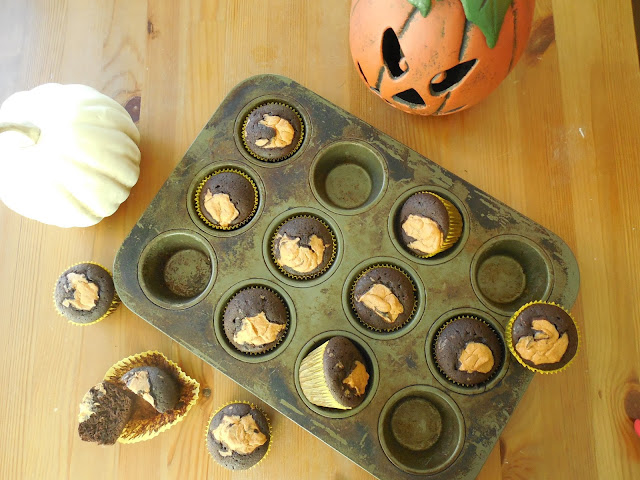
pumpkin black bottomed muffins


These muffins make me so happy.   Fudgy chocolate muffins topped with pumpkin goodness just can't be beat.

One of my favorite fall recipes is a cream cheese based dip (perfect for ginger snaps or apple slices).  I love it sooo much, and I wanted to find other uses for it to spread the joy when I remembered how awesome classic black bottomed muffins are.  I switched out the plain cream cheese for my dip and I really love the result.  The orange color is such a cheerful addition to the muffins, but the real treat is the pumpkin and orange flavors added.  Seriously, I want to eat the whole batch.  Luckily I've got three built in taste testers at home to eat them all for me.

I even have a clean up crew for the kitchen (in the fall at least).  It's amazing how quickly you can get a kid to help you sweep the kitchen when they realize they have a perfect witch broom to ride on already in their hands.  I kid you not.  My kitchen floors have never been cleaned than they are today.


I could have eaten this entire batch of muffin batter raw.  It looked and tasted just like fudge.  *Insert drool here*.  If you already have a well-loved chocolate muffin recipe, feel free to use it.  Just swirl a spoonful of pumpkin dip on top and bake according to your regular directions.


Seriously though, doesn't this just look like truffle filling or fudge?


I used a small spoonful over each muffin because I didn't want the entire top covered in orange, but how much you use is really up to you, as long as you don't overfill your cups.


Note: the chocolate will bake quicker than the pumpkin dip, so if the pumpkin topping still looks a bit undercooked when the muffins have finished baking, don't fret.  They firm up nicely once they've set.

 I like they messy, natural style of the orange tops, but after I made these Jeff had a great idea if you crave more structure and theme.  Pipe a large circle of pumpkin topping onto the center of the muffins and bake.  Once they've baked and set, use black frosting with a small piping tip to draw a Jack o' lantern face into the center of the orange.  Cute!


Okay, these are just gratuitous muffin shots.  I just couldn't decide which ones to post, so I posted most of them...  :)


I've had this pumpkin dip recipe for ages, and I can't for the life of me remember where I found it.  Let me know if you know who created it so I can give credit.  I love it, but it's not mine.


Pumpkin Dip

Ingredients:

  • 8 oz. cream cheese
  • 14 oz. marshmallow creme
  • 15 oz. pumpkin puree
  • 1 tsp cinnamon
  • 1 tsp orange zest
Directions:
  1. Whip the cream cheese using a stand or hand mixer for about 3 minutes, or until fluffy.
  2. Add in the pumpkin puree and blend thoroughly.
  3. Add in the marshmallow creme and blend thoroughly.
  4. Add in the cinnamon and orange zest and mix until just combined.
  5. Serve immediately or refrigerate in an airtight container until ready to serve.  
uses: 
  • dip for ginger snaps or apples
  • top chocolate muffins just before baking
  • spread between cake layers
  • etc.
note: I LOVE orange, so sometimes I like to add an extra teaspoon of orange zest.


Chocolate Muffins
makes about 12

Ingredients:
  • 3/4 cup cocoa powder
  • 1 tsp baking powder
  • 1/2 cup boiling water
  • 3/4 cup melted butter
  • 1 tbsp vanilla extract
  • 1 1/4 cups granulated sugar
  • 2 eggs
  • 1 1/3 cups AP flour
  • 1/4 tsp salt
Directions:
  1. Preheat oven to 350 degrees F, and line a muffin tin with wrappers.
  2. In a medium bowl, combine the cocoa and baking powder.
  3. Whisk in the boiling water.  Once smooth whisk in butter and vanilla.
  4. Whisk in sugar, then whisk in the eggs one at a time
  5. Whisk in the salt and flour and stir until smooth.  The batter should look like thin fudge.
  6. Use a scoop to evenly distribute the batter into the muffin cups.
  7. Spoon a small spoon of pumpkin dip over the tops of the muffins.
  8. Bake for 25-30 minutes, or until an inserted toothpick comes out clean.  Remove from the oven and let sit on the counter for 10 minutes.  Enjoy!
Note: make sure the toothpick is inserted into the chocolate and not the pumpkin, as the chocolate part cooks faster and is more accurate.

Tuesday, September 1, 2015

chocolate covered cherry smoothie


Sorry my blog posts have been a bit few and far between lately.  At least it feels that way.  From a few weeks ago through almost Thanksgiving is crazy for me.  My day planner seriously looks ridiculous.  I keep not having time to cook and/or post.  And its driving me crazy.

Since I haven't had much free time lately I've been creating new smoothie recipes.  I love a quick breakfast I can take on the go that's also healthy and delicious.  This smoothie is all of the above, plus only contains 4 ingredients!  It's a yummy no-brainer.

My frozen cherries are nice and sweet (without added sugar).  This smoothie is perfectly sweet even though the only sweetness comes from the cherries.  Make sure your cherries aren't too tart or you might want to add a bit of vanilla yogurt for the sweetness.  Can I say sweetness a bit more?  Yeah, I guess I can.  :)


I like to toss a frozen cherry or two on top.  They sink down and I eat them last.  I love cherries, these are better than normal because they're nice and cold and have a layer of chocolate smoothie covering them.  Yum...


Jack is going through a phase where he INSISTS on using a spoon for every meal.  Yes, even smoothies.  He's very civilized (read: nerd).  Although, I gotta say, watching a kid eat things like crackers and cheese with a spoon is pretty entertaining.


This smoothie is Jack approved.

Chocolate Covered Cherry Smoothie
serves 2

ingredients:

  • 1 scoop vanilla whey protein powder
  • 1 cup frozen cherries
  • 2 tbsp unsweetened cocoa powder
  • 1 cup almond milk
  • ice cubes (optional)
directions:
  1. Dump all ingredients in the blender and puree.  Optional ice cubes will make the smoothie thicker and icier.  Drink immediately.  Enjoy!

Thursday, August 13, 2015

double chocolate fig muffins


Try as I might, I just can't do these muffins in photos.  It's always difficult to capture the true yumminess of something when the chocolate makes them so dark.  I love these muffins.  They are dark, chocolatey, and fruity.


Want to hear something even better?  They're chock full of protein!  Each muffin has about 6 grams of protein in it.  This muffins are healthy (yes, they're still full of chocolate), yummy, and filling.  They are also approved by everyone at our house.

There is a very slight protein after taste, so if you REALLY are against that, just use more flour, less protein powder.  It's an even substitution.


Double Chocolate Fig Muffins
makes about 16 muffins

Ingredients:

  • 1 cup unbleached flour
  • 1 cup vanilla whey protein powder
  • 1 tbsp baking powder
  • 1 tsp baking soda
  • 1/2 tsp salt
  • 1 1/2 tbsp cocoa powder
  • 1 cup granulated sugar
  • 6 tbsp unsalted butter
  • 1 large egg
  • 2 tsp vanilla extract
  • 1 1/4 cup plain Greek yogurt
  • 1/2 cup mini semi-sweet chocolate chips
  • 3 large figs, diced
Directions:
  1. Preheat oven to 400 degrees F.  Grease your muffin tin.  
  2. In a medium bowl stir together the flour, protein powder, baking powder, baking soda, salt, and cocoa powder.  Set aside.
  3. Cream together the butter and sugar in a stand mixer.  Add in the egg and vanilla and mix again.  Mix in the Greek yogurt, then slowly add in the dry ingredients while mixing on low.  Do not over-mix.  The batter should be fluffy and light.  Gently stir in the chocolate chips and the diced figs.
  4. Evenly spoon the batter into the muffin cups and bake for about 20 minutes, or until an inserted toothpick comes out clean.  Let cool for 10 minutes, then remove from the muffin tin and let cool completely on a wire rack.
note: these muffins make a great healthy snack for kids.  If you want to make the recipe using mini muffins, bake for 16 minutes instead of 20.

Thursday, August 6, 2015

chocolate protein smoothie


I NEVER remember to eat breakfast.  I make it for everyone else, but mornings are when I wander around the house getting everything done.  It's gotten to the point where I had to put a sticky note on top of the coffee maker reminding me to eat breakfast.  Because of course I would never forget my morning coffee.

My best bet for breakfast is a grab and go option.  I love things like cinnamon rolls (obviously), but I'm either busy or I don't want anything too filling.  This drink is perfect.  Filling, easy to grab, and delicious.


To make this drink even easier and quicker in the morning I dump all the ingredients into tupperware in the fridge the night before.  That way the chia is easier to blend (having had all night to plump up), and all I have to do in the morning is dump one container's contents in the blender.  Simple.

I normally end up making a double batch though.  Everyone always asks for "just a few sips", and that adds up quickly!

I love having a super thick smoothie that fills me up and gives me hours of energy, especially when it feels and tastes like I'm drinking a chocolate shake (for breakfast.  Yay!)


This is the average meal for Jack and me on days when Liam is at preschool and Jeff is at work.  They almost always end up with bits of sandwich, plus a train (or two) and a cat on the table with us.  Plus Jack always decides that whatever I'm eating is what he wants.  We'll be eating THE SAME THING, but mine is in a different container than his, so...


If I'm using a cup, plate, bowl, etc. that looks like he could easily break it then Jack wants it even more.  And heaven forbid I try to help him hold it.  Nope.


He stills makes me a little nervous, but he hasn't broken any dinnerware yet *sigh of relief*.  I'm happy to share.  :)


Chocolate Protein Smoothie
makes 1 large or 2 small servings

Ingredients:

  • 2 cups unsweetened vanilla almond milk
  • 3 tbsp chia seeds
  • 1 heaping tbsp cocoa powder
  • 1 scoop protein powder (I prefer vanilla flavored whey)
  • sugar to taste
  • 1 banana, frozen
  • ice (optional)
Directions:
  1. For best results combine all ingredients overnight in the fridge.  In the morning pour out into a blender.  Blend thoroughly.  Enjoy immediately.
note: Ice is only needed if you do not use a frozen banana, or if you want an extra cold and icy smoothie.

If you make the smoothie entirely in the morning it might take a little more blender time to break up the chia seeds.

Sunday, June 28, 2015

no bake chocolate cheesecake mousse


Let's just say I'm glad this mousse is served in 4 individual cups, because otherwise I'd want to eat it all in one sitting.  I would die from richness and sugar, but it might be worth it.


 This is a great dessert to make ahead if you have company, or if you want to have dessert planned out for yourself for 4 days!  Not that I would do that...

This really is an awesome dessert though.  It's pretty darn quick to make (not counting chill time), its easy to make, and it requires only a tiny amount of ingredients.

You can change it up too.  Sometimes Jeff prefers classic cheesecake mousse, which involves cancelling the last tablespoon of whipping cream and the cocoa powder.

You could also make a fruit topping over the top, or add in a different flavor extract.  Lemon, mint, I could go on.

Also, Jeff loves his mousse semi-frozen.  He sticks his in the freezer for about 30 minutes before eating.


recipe adapted from Cooking Classy

no bake chocolate cheesecake mousse
serves 4
Total time: 2 hours 20 minutes

ingredients:


mousse:

  • 8 oz. cream cheese
  • 2/3 cup powdered sugar
  • 2 tablespoons cocoa powder
  • 2/3 cup + 1 tablespoon heavy whipping cream
  • 1/2 tsp corn syrup
  • 1 tsp vanilla extract
crust:
  • 1 package graham crackers (about 8), crushed
  • 1 tbsp packed brown sugar
  • 1/4 cup melted coconut oil

directions:
  1. In a medium bowl use a hand mixer  on high speed to whip the heavy whipping cream until soft peaks form.  Add in the corn syrup and whip again until stiff peaks form.  Set aside.
  2. In a stand mixer with a whisk attachment whisk the cream cheese for about 3 minutes, until fluffy and light.  Add in the powdered sugar, cocoa powder, and vanilla.  Whisk until well mixed.  
  3. Mix in the whipped cream mixture in two batches, until just combined. Set aside.
  4. Put the graham crackers in a sealed freezer bag and crush with your fists, a mallet, etc.
  5. Add the brown sugar into the bag and shake to combine.
  6. Pour in the coconut oil and seal the bag.  Massage with your fingers to mix well.  
  7. Divide the crust into 4 cups or small bowls and pack down with your fingers, a large spoon, etc.
  8. Pour the mousse evenly into the 4 cups and refrigerate for at least 2 hours, up to a few days.  Enjoy!

Friday, May 29, 2015

homemade healthy fast food


We don't eat fast food very often.  It's usually a special treat, or a "well, we're already out of the house, starving, and have no food at home".  Of course you wouldn't know it by talking to Liam.  He acts like we go all the time, and will point out every "Donald's" location he sees.

I'm not really a fan of fried foods, and I try to make everyone happy with their food, so I thought I'd make some healthy versions of fast food instead.  I came up with


  • baked chicken nuggets
  • baked fries
  • chocolate covered strawberry shake (smoothie)

I used sweet potatoes for this recipe, they're just what I had on hand.  Russet potatoes or yams could be used instead.  Whatever you prefer.

Peel the potatoes and slice them up.  I like mine like steak fries.  Bonus if you cut them like steak fries because they take the same cooking time as the chicken so you can bake them for the same time.


Once the potatoes have been cut stick them into a freezer bag and season.  This makes the seasoning distribution so much more even.


I always let the kids shake the bag.  Next time I might have to video it.  They get really into it!


Classic breading station for the chicken.  Get a bowl each for flour, beaten egg, and seasoned breadcrumbs.  Work left to right covering fresh defrosted chicken pieces one at a time in the contents of each bowl.  Try to keep your fingers out of the contents as much as possible or you'll end up with "monster hands".  Liam thinks that part is hilarious.  Place the chicken pieces on a parchment covered baking sheet when they are ready.


 Once the potatoes and chicken are prepped, bake together at 375 degrees for 30 minutes.  If you want to you can broil them for 2 minutes at the end for extra crispiness.


This is one of Liam's favorite ways to have chicken.  I only make it this way occasionally.  I don't want him to get too used to the idea of "fast food style".  :)

You know how people say that a great way to get kids to eat healthy is for them to cook their own food?  Liam's hands down favorite chicken is when I give him carte blanche of my spice drawer and let him season a whole chicken breast for himself.  My little string bean will inhale the whole thing that way!  Crazy.


This meal all came about from a few days ago when we had NO groceries at home, we were doing a million errands around town, and Liam was being an angel (I know, right?).  I promised him I'd split a milkshake with him on our way home, but the closet McDonald's milkshake machine was broken.  Liam was devastated, so I told him I'd make him one at home.  He had his heart set on strawberry, and I figured that would be the easiest flavor to make healthy anyway... 


baked fries

ingredients:
  • 4 medium potatoes (russets, yams, or sweet potatoes)
  • 1 tbsp olive oil
  • 1/2 tsp salt
  • 1/4 tsp black pepper
  • 1/4 tsp garlic powder
  • 1/4 tsp oregano
directions:
  1. Preheat oven to 375 degrees F.  Peel potatoes and slice steak fry style
  2. place potatoes slices in freezer bag with oil and seasonings. Shake well.
  3. Place on a parchment lined baking sheet.  Bake 30 minutes.
  4. (optional) broil for 2 extra minutes for crispiness.

baked chicken nuggets

ingredients:
  • 3 defrosted chicken breasts, cut into pieces
  • 1 1/2 cups AP flour
  • 2 eggs, well whisked
  • 1 1/2 cups seasoned breadcrumbs (I like Italian seasonings)
  • 2 tbsp parmesan
  • 2 tbsp olive oil
  • garlic, salt, pepper, basil, chili powder to taste
directions:
  1. Preheat oven to 375 degrees F.  Set out 3 bowls in a row.  Left to right fill with flour, whisked eggs, and breadcrumbs with seasonings and olive oil.
  2. Have a parchment covered baking sheet set out in easy reach of the bowls.
  3. Quickly dredge chicken in the bowl contents left to right, keeping your fingers as clean as possible.  Place finished chicken on baking sheet.
  4. Bake for 30 minutes.  Outside should be golden.

chocolate covered strawberry "shake"

ingredients:
  • 12 oz. strawberry Greek yogurt
  • 3 tbsp unsweetened cocoa powder
  • 2 cups frozen strawberries
  • 1 cup milk
  • 1 tbsp honey (optional)
directions:
  1. Place all ingredients in blender and blend!  Pour and drink. Depending on the sweetness of the strawberries, honey may or may not be utilized.


Sunday, May 3, 2015

chocolate chocolate cake


Okay, neither the recipe for the cake or the frosting belong to me, but they are so good together.  This is my go to chocolate cake.  The cake is dark, moist, and not overly sweet.  The frosting is fluffy, super chocolaty, easy to apply, and makes plenty extra.  I personally like to make sandwich cookies with the extra chocolate frosting spread thick between two graham crackers.  So good!  My parents used to make them with extra frosting when I was little.  Keep the extras in the fridge to help firm them up.


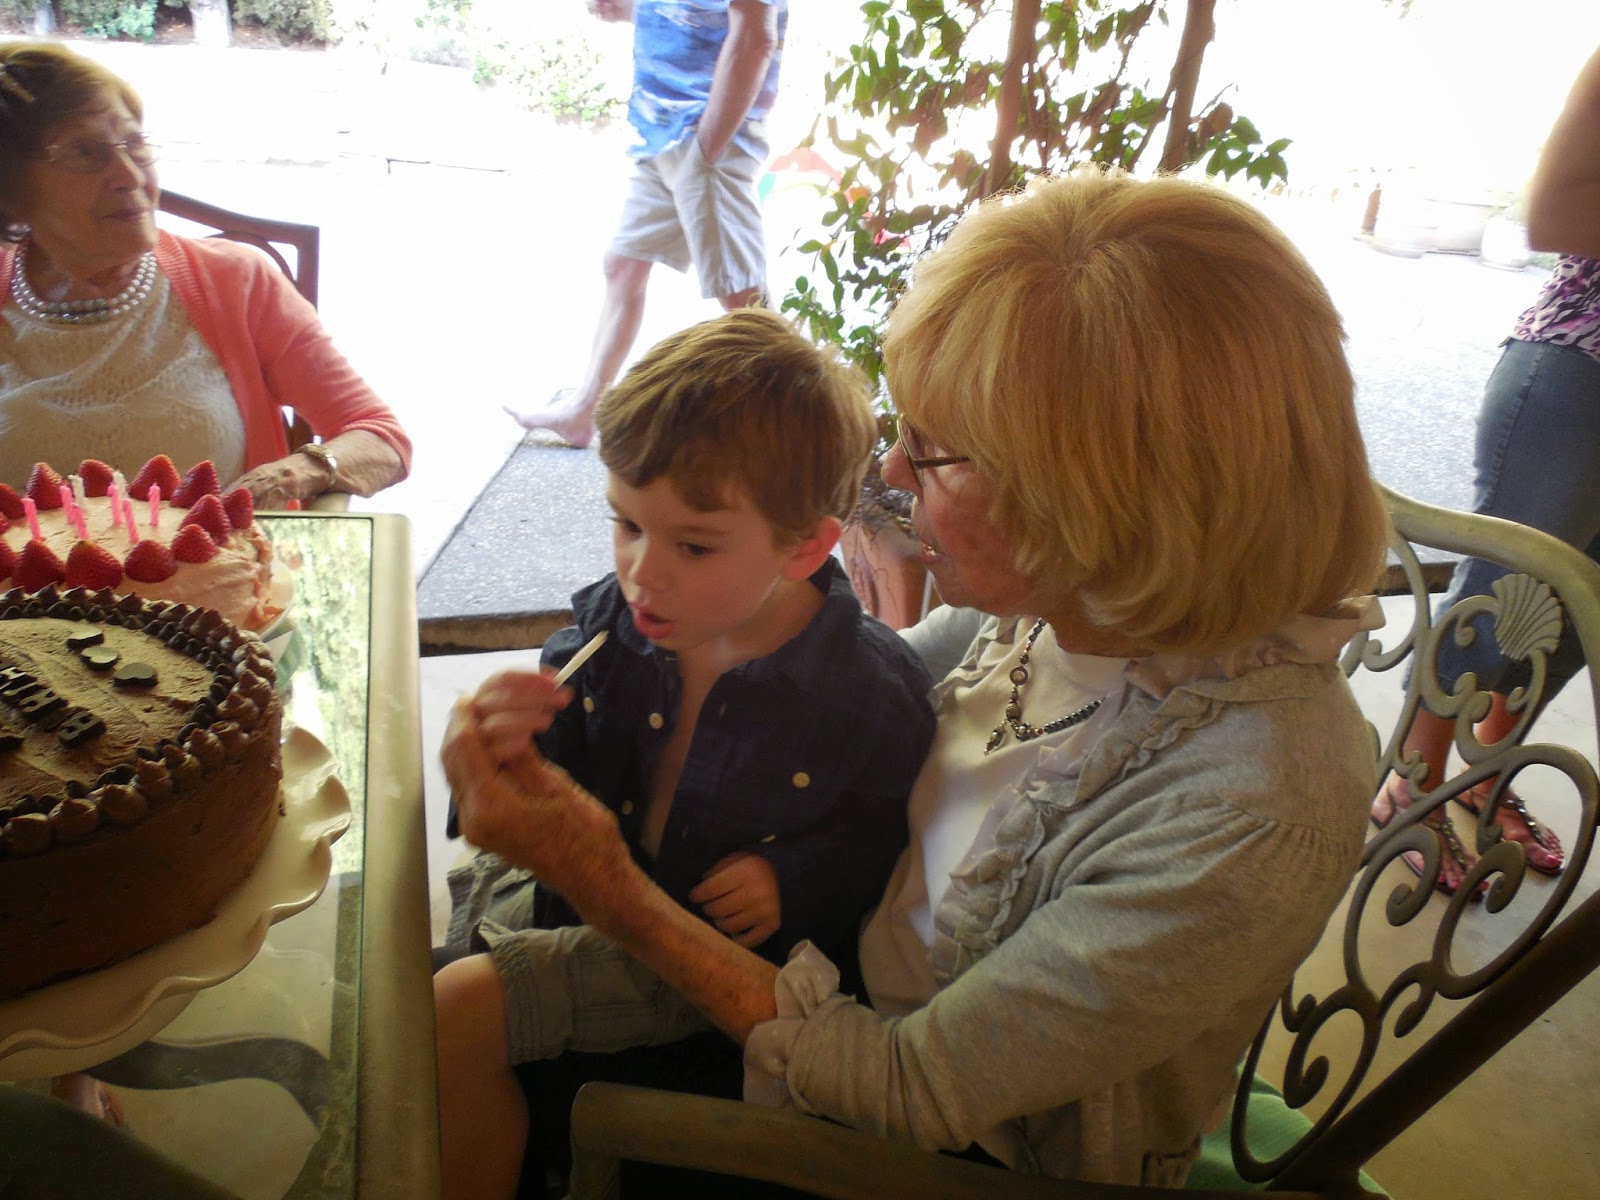
Last week was a milestone birthday for my Mupma.  She'd totally kill me if I said the exact age.


I wanted to make the cake a bit fancier for her birthday and I had plenty of extra frosting, so after frosting the cake I put some in a piping bag and piped the edges, then lined it with chocolate chips.  I still have about 2 ups of frosting left so I foresee some graham cracker sandwiches in my near future.  :)


I ordered a small silicone alphabet mold a while ago from amazon (I heart amazon!) and used it to make the "Happy Birthday" and the hearts.  It set pretty quickly, but just to be safe, I made the letters ahead of time.  This was the first time I'd used the mold, so next time I know I need to tap it more after I've poured the chocolate in to try and get rid of the dreaded air bubbles.


Liam LOVES his Mupma.  He kept jumping into her lap all evening, and helped blow out the candles.  Ignore the candle covered cake for the moment, that's all for the next post.


Liam immediately pulled the blown out candles out of the cake and insisted that everyone needed to eat the frosting off of them.  "Because that's what you do!"


Someone was pretty excited to officially get his own piece of chocolate cake.  He ate the whole piece (inhaled actually) and ran around like crazy the rest of the evening with a chocolate fu manchu.


Chocolate Cake
recipe by Betty Crocker
prep: 20 min
bake: 35 min
cool: 1 hr
12 servings

Ingredients:

  • 2 1/4 cups AP flour
  • 1 2/3 cups sugar
  • 3/4 cup unsalted butter, softened
  • 2/3 cup cocoa powder
  • 1 1/4 cups water
  • 1 1/4 tsp baking soda
  • 1 tsp salt
  • 1 tsp vanilla
  • 1/4 tsp baking powder
  • 2 large eggs
Directions:
  1. Heat oven to 350 degrees F.  Grease bottom and sides of two 9 inch pans.
  2. In large bowl, beat all ingredients with electric mixer on low speed 30 seconds, scraping bowl.  Beat on high speed 3 minutes, scraping bowl occasionally.  Pour equally into pans.
  3. Bake 30 to 35 minutes, or until toothpick comes out clean.  Cool in pan 10 minutes, remove from pans and cool completely on wire racks for 1 hour.  Frost.
note: the cake puffs up, so you might want to trim the tops off.  For this cake I only trimmed the top off the top layer, just because I wanted the top to be flat for the birthday message.  It's really up to you.


My Favorite Chocolate Buttercream Frosting
recipe by Cooking Classy
Ingredients
  • 1 1/2 cups butter, at room temperature (I like to use 1 cup unsalted and 1/2 cup salted)
  • 3 3/4 cups powdered sugar
  • 3/4 cup cocoa powder*
  • 3 - 4 Tbsp heavy cream or half-&-half
  • 1 1/2 tsp vanilla extract
Directions
  • In a the bowl of an electric stand mixer, fitted with whisk attachment (paddle attachment works too. Whichever you use just pay attention the the shade of the butter), whip butter on moderately high speed until very pale and fluffy (nearly white in color), about 6 - 8 minutes, occasionally scraping down sides of the bowl. Sift in cocoa powder then add in powdered sugar, 3 Tbsp heavy cream and vanilla and mix on low speed until combine, scrapping down the sides of the bowl as needed and adding up to 1 tbsp additional cream to thin if desired. Increase mixer to medium-high speed and whip mixture until pale and very fluffy about 4 - 5 minutes, occasionally scraping down sides of the bowl.
  • Note that similar to whipped cream the frosting will lose some of its "fluff" after a few hours, it will still taste the same it just loses some of the air that was whipped into it (similar to whipped cream how it loses it's stabilization after a few hours). It is best to prepare and use within a few hours for best (fluffiest) results.
  • Recipe Source: Cooking Classy