Showing posts with label easy. Show all posts

Thursday, March 24, 2016

Garlic Rosemary Chicken Bake


I love one dish dinners.  They look fancy, they're so easy to make, and less dishes for me to wash!

This one was a big hit with my boys.  They love anything chicken or bacon, and this has both!
The best part was that I only needed about 5 minutes of prep before I had the whole dish finished and stuck in the oven, but the boys still thought it looked fancy and impressive.  

I don't have a million photos of this like some other dishes, but I'm probably going to make it again pretty soon, and I'll add more photos then, okay?  :)

Garlic Rosemary Chicken Bake
serves 3

Ingredients:
  • 3 whole chicken breasts (I used frozen ones, no thawing needed!)
  • 3 russet potatoes
  • 1/4 Cup garlic cloves, peeled
  • 3 branches rosemary
  • 3 strips bacon
  • 2 teaspoons olive oil
  • 1/2 teaspoon salt
  • 1/4 teaspoon black pepper
  • 1/2 teaspoon garlic powder
Directions:
  1. Preheat the oven to 375 degrees F.  Drizzle 1 teaspoon olive oil onto the bottom of a 9x13 inch casserole dish.  
  2. Slice the potatoes into medallions and lay them flat in the dish.  Lay the chicken breasts on top of the potatoes.  Slice the bacon into 1" pieces and lay the pieces on top of the chicken and potatoes.  Sprinkle the garlic cloves over the bacon, and lay the rosemary branches down as well.  Season with the remaining 1 teaspoon olive oil, salt, pepper, and garlic powder and slide into the oven.  
  3. Bake for 60 minutes, or until the bacon and chicken are fully cooked.  


Thursday, March 10, 2016

Blueberry coffee cake


This is one of the easiest baking recipes ever.  Okay, I totally cheat here and use Bisquick.  Normally I am a "completely from scratch" type of baker, but I like to keep a bit of Bisquick on hand in case I want something baked very quickly, or run out of too many essential ingredients.

Liam was my baking assistant today.  He was so excited to get stirring and egg cracking duty (his favorite), but he was mostly excited to eat them... :)


The picture above was Liam instructing me to take a picture that looked like he was trying to eat the uncooked coffee cakes.   Silly boy.

As you noticed, I used mini fluted pans for this recipe.  Totally unnecessary, but SO pretty!  Plus portion controlled.  Always a plus!  If you don't have a mini fluted cake pan, just use a 9" cake pan.

I love this recipe because it's so simple, and sometimes in the mornings I completely forget about breakfast... but it's okay because this recipe only takes about half an hour to make!


Blueberry Coffee Cake
serves 6

Ingredients:

  • 1 3/4 Cups Bisquick
  • 3/4 Cup skim milk
  • 1/4 Cup granulated sugar
  • 1 tablespoon unsalted butter, melted
  • 1 large egg
  • 2 tablespoons old-fashioned oats, uncooked
  • 1 teaspoon cinnamon
  • 2/3 Cup blueberries
  • 1/4 Cup brown sugar, unpacked
Directions:
  1. Preheat oven to 375 degrees F.  Spray a mini fluted cake pan (or one 9" cake pan) with baking spray and set aside.
  2. Stir all ingredients except the blueberries until there are no lumps.  Gently stir in the blueberries.  Pour the mixture evenly into the prepared pan.  Sprinkle brown sugar over the tops.  Bake until inserted toothpick comes out clean.  Remove from oven to cool for 5 minutes before eating.

Bake times:
mini fluted pan: 16-18 minutes
9" cake pan: 18-23 minutes

Tuesday, February 23, 2016

Peach Crisp Overnight Oats


I think I've made it pretty clear how much I like a sweet breakfast, especially one I can grab as I'm running out the door in the morning.  This peach crisp overnight oats recipe is my new favorite.  Its perfect for this gorgeous early spring weather and makes me so happy when I eat it!  

I love the serious peachy flavor from the oats and at less than 300 calories per serving, plus 14 grams of protein this little jar will keep me going all morning.  It tastes like dessert, makes me happy, and doesn't make me hangry halfway through the morning like some other quick breakfast can.  

I like putting my overnight oats in cute jars so they're easy to grab the next morning, but it also helps with portion control.  Yeah, I'd probable eat more of it because its so good, but its really the kids I portion it for. They can be little rage monsters if I don't give them the right amount, but if its already in a little jar?  Crisis averted.  Yay!

I love making overnight oats because it takes ingredients I keep in stock anyway, one big bowl, and 5 minutes the night before to make.  You can't beat it.  Sometimes I'll double the batch or make single batches of different flavors.  My other favorite is chocolate.  


Peach Crisp Overnight Oats
serves 3

Ingredients:
  • 1/2 Cup unsweetened apple sauce
  • 6 oz. peach yogurt (1 yoplait container)
  • 1/2 Cup vanilla whey protein powder
  • 1 1/3 Cups old-fashioned oats, uncooked
  • 1 teaspoon cinnamon
  • 1/2 Cup unsweetened vanilla almond milk
  • 1-3 teaspoons sugar (optional)
Directions:
  1. Mix all ingredients in a large bowl until fully incorporated. 
  2. Portion into 3 airtight containers (mason jars, tupperware, etc.)
  3. Refrigerate overnight.  Enjoy cold.  
Note: These containers last at least a week in the fridge so don't worry if you want to make several batches at a time.


Saturday, February 20, 2016

Caramel Apple Pie


Who doesn't love pie?  Crazy people I guess.  This pie is delicious (and totally gone.  It really didn't last long!) and smells amazing.  Plus, it was super easy to make, and didn't require very many ingredients.

I know what you're probably thinking.  Geez, that crazy girl is posting ANOTHER dessert?  Does she ever make real food?  Okay, maybe you weren't thinking that.  ...But you probably are now I guess.  I do really love baking.  The smell alone is wonderful, but also because sometimes I get busy or really want something familiar.  I have posted many real food recipes, and I have more favorites that I won't post because they aren't mine, and I tend to not try as many new dinners as I do desserts.  I will try to post more savory dishes soon though.

Plus, look at these pictures.  Who wouldn't want to have this in their house?  It's a good thing I have three boys with sweet tooths here to eat most of my desserts or I'd be in real trouble.


I totally cheated and used a store bought pie crust.  I'll make pie crust if I have to, but in general if I'm going to cheat in my desserts it's going to be using store bough pie crust or puff pastry.  I'm pretty sure I'm NEVER going to make puff pastry.  EVER.


This pie is flat because I have a 10" pie pan and an 8" or 9" is really preferable.  Pies are so much prettier with a bit of a domed center.

Pies are even better a la mode.  Seriously, a scoop of vanilla ice cream on this pie is heavenly.


Caramel Apple Pie

Ingredients:

  • 8 apples, peeled and thinly sliced (I used braeburn and fuji)
  • 1 tablespoon lemon juice
  • 4 tablespoons unsalted butter
  • 1 tablespoon cinnamon
  • 1 teaspoon nutmeg
  • 3/4 Cup Kraft caramel bits
  • a pinch of salt (forgo if using salted butter)
  • 1 teaspoon vanilla extract
  • 1 egg
  • 3/4 tablespoon granulated sugar
  • 1 package 2 rolled pie crusts
Directions:
  1. In a large pot on medium heat stir together the apple slices, lemon juice, butter, cinnamon, nutmeg, caramel, and salt.  Stir occasionally to mix and prevent sticking.  Remove from heat when the apples have softened, and the caramels have melted.The mixture should not be overly runny.  Stir in the vanilla.
  2.  Preheat the oven to 425 degrees F.  Spray your pie pan with cooking spray and lay out the bottom crust.  Pour in the pie filling.  Apply the top crust.  I like using a lattice, but a full top is fine too.  Just be sure to cut a few slits in the top.
  3. Beat the egg and gently brush it over the crust.  Sprinkle the sugar over the wash.
  4. Bake for 35-40 minutes, until the crust is golden.  Remove from the oven and allow to cool completely on the counter before storing in the refrigerator.  Do not be concerned if the pie looks runny when hot.  Once the caramel cools the pie will firm up nicely.  Enjoy by itself or a la mode!

Saturday, February 13, 2016

nothing says Valentine's Day like bacon and chocolate!


Yeah, that's right.  A chocolate bacon bar.  What says's "I love you" like chocolate and bacon?  

If you need last minute ideas for Valentine's Day, or just really want to keep these all to yourself, this recipe is easy and yummy.  Being a vegetarian I haven't tried them myself, but Jeff ate half the batch in a day, so they must be good!


Be prepared for gratuitous chocolate photos.  They were just so pretty!  I couldn't narrow it down.  :)


 These chocolates are great.  All you really need is bacon and chocolate chips.


Start by laying 5 strips of bacon on a foil lined lipped baking sheet.  If you want to infuse some extra sweetness you can brush two teaspoons of maple syrup over the bacon.  Bake at 400 degrees F for 10-15 minutes until cooked but not crispy.  I baked mine for 12.  Take the bacon out and let it cool for a few minutes.  Dice the bacon as small as you can and place it on clean foil on the same baking sheet.  Bake for 2-5 minutes until its a bit crispy.  Remove from the baking sheet and place on a plate lined with paper towels.


While the bacon is cooling get out a small double boiler and slowly melt 2 cups of chocolate chips until smooth and shiny.  You can use whatever shape molds you want (these are silicone cupcake sized molds).  Make sure the mold interiors are clean and completely dry.  Spread a thin layer of chocolate on the mold bottoms to insure the candy tops are flat and clean when they're finished.


Mix the bacon into the melted chocolate and evenly pour into the molds.  I filled my molds 1/3 of the way up and they were pretty thick.  I made 9 chocolates, but you could make up to 12 without them being too thin.  Firmly tap the molds on the counter a few times to get rid of any possible air bubbles and to make sure the chocolates lay flat.  Let the chocolate sit out for a few hours to harden completely.  


When the chocolate is firm gently remove them from the molds.  They could be finished at this point, or you could decorate them like I did.  I used 1/4 cup of red candy melts to decorate.  These are pretty easy to use.  Put your candy melts into an uncut piping bag, or a sandwich bag and microwave upright in a plastic cup for 30 seconds at a time until evenly melted.  Snip a small hole in the bag tip.

Lay the chocolates out on parchment paper and very quickly create a pattern on the chocolates.  Let them dry.

Once the candy melt decorations have dried pick up the chocolate and snap off any small pieces hanging off.

Enjoy! Try not to eat them all in one day.


Chocolate Bacon Bars

Ingredients:

  • 5 strips of bacon
  • 2 teaspoons maple syrup (optional)
  • 2 Cups semi-sweet chocolate chips
  • 1/4 Cup red candy melts (optional)
Directions:
  1. Preheat oven to 400 degrees F. Lay bacon out on foil lined lipped baking sheet.  Optionally brush bacon with maple syrup. Bake for 10-15 minutes until bacon is cooked but not crispy.
  2. Dice bacon finely and return to oven on clean foil lined baking sheet for 2-5 minutes, until crispy but not burnt.
  3. Let bacon cool on paper towel covered plate.
  4. Prep a double boiler and slowly melt the chocolate chips until smooth and shiny.
  5. Spread a thin layer of chocolate on the mold bottoms, then mix the bacon into the chocolate mix and evenly pour into the molds, about 1/3 of the way to the tops.
  6. Tap the molds on the counter to remove possible air bubbles and flatten the chocolate.  Let dry completely. 
  7. Optional decoration: lay solid chocolate on parchment paper.  Put the candy melts into an uncut piping bag or sandwich bag and microwave upright in a plastic cup for 30 second intervals until melted evenly.  Snip a small hole in the bag tip and very quickly drizzle a pattern onto the chocolates.  Let dry.  Pick off any small bits of candy hanging off the chocolate bars.  Enjoy!


Thursday, February 4, 2016

Chocolate Pudding


I love chocolate pudding.  It's such a good comfort food.  Jeff loves chocolate too.  Some nights if I haven't made a dessert he will just grab a prep bowl full of chocolate chips.

This recipe is great.  It takes just a few minutes to make and only uses a handful of ingredients.  I can make it quickly during nap time and by dinner time its firm and ready to eat.  You can ever prepare it a day in advance if you want too (or have dessert for two people two nights in a row...)


I always put a huge dollop of whipped cream on top of my pudding.  Homemade is great if you've got the time, other days its cool whip all the way.  Sprinkles are good too!


Chocolate Pudding
serves 4

Ingredients:

  • 2 1/3 cups milk (I used 2%)
  • 2 1/4 teaspoons (1 packet) unflavored gelatin
  • 1/4 cup granulated sugar
  • 2/3 cup chocolate chips
Directions:
  1. In a pot off the heat stir together the gelatin and 1/3 cup of milk and let sit for a minute until the gelatin has been dissolved.
  2. Turn the heat to medium and stir in the sugar and remaining 2 cups of milk.  Once the sugar has dissolved and steam is starting to rise, turn the heat off and slowly stir in the chocolate chips until they have dissolved.  Pour the pudding into 4 containers and refrigerate for at least 4 hours.
Note: Make sure you pour the pudding into heat safe containers or let the pudding cool a bit in the pan before pouring.  Nothing sucks more than pouring hot pudding into a delicate glass and hearing loud cracks happen.  Ack!

Saturday, January 30, 2016

Roasted Garlic


Okay, so this isn't much of a recipe because its so simple.  I guess its more of a public service announcement?  Because garlic is awesome, especially when its roasted, so everyone should eat more of it because its delicious and I don't want to be the only one with crazy garlic breath.

I go through a ton of garlic, and I hate spending all my time peeling it so lately I've been buying the huge pre-peeled bag of it at Costco.  Its so worth it.

This garlic spread is super yummy when served with good bread.  I like using it with the best bread.

This spread is great for an appetizer, or I also like serving this with a big hearty bowl of black bean soup.


Roasted Garlic

Ingredients:

  • peeled garlic
  • olive oil
  • salt
  • black pepper
  • basil
  • oregano
  • cayenne
Directions: 
  1. Use whatever amounts you want of each ingredient and dump them all into a small oven safe container.  Quickly stir them up a bit to evenly mix the flavors together.
  2. Bake at 325 degrees F for 60-75 minutes with your container loosely covered in foil.  The garlic is done when it is very tender and not too brown or firm.
  3. Spread onto bread and enjoy!  It should spread like warm butter.  

Tuesday, January 26, 2016

Panna Cotta


Doesn't this just look so fancy?  Yeah, it took me a whooping 5 minutes to make.

Panna cotta is such a great dessert.  It's quick to make, it requires very few ingredients, it looks so fancy, it isn't messy to eat, you can make it a day ahead of time.  Shall I go on?  Oh, and obviously, it tastes great too.  If you aren't familiar with panna cotta, it's like a vanilla pudding, and means "cooked cream."

Since this is such a simple dessert you can change it up every time you make it.  You can either serve the panna cotta in a pretty glass or turn the dessert out from a fancy mold and serve on a plate.  There are many sauce and flavoring options as well.  Jeff is a big fan of strawberry, I love orange and cranberry.


I know my panna cotta is ready when I can turn the glass over and nothing moves.  It totally reminds me of getting a Blizzard at Diary Queen as a kid.  That was always my favorite part.  Wow!  It didn't fall out!  Hi.  I'm a grown up and still fascinated by that.


I love all things orange creamsicle.  This panna cotta isn't super pretty with the thin color on the top but I really don't care.  I wanted to infuse the orange flavor throughout so after about an hour and a half in the fridge I poured about a tablespoon of orange curd over the panna cotta and allowed it to sink to the bottom.  This way I had the layer of orange covering the bottom, but also got a hint of orange through.  Yummy!

I made my orange curd, but store bought is fine.  You could also try lemon curd, strawberry jam, a fruit compote, fresh fruit, chocolate sauce, etc.


This go around I used a cranberry pomegranate curd on the top, which I spread on after 4 hours.  I just love that bright color!


I like using a wide glass for the panna cotta so I get my fruity topping in every bite.

Panna Cotta
serves 6

Ingredients:

  • 1/2 Cup milk
  • 1 1/2 packets of unflavored gelatin
  • 2 Cups heavy cream
  • 1/3 Cup granulated sugar
  • 1 tsp vanilla paste or extract
  • fruit topping of your choice

Directions:
  1. Combine the milk and gelatin in a medium saucepan off the heat and allow to absorb for 5 minutes.
  2. Add the cream, sugar, and vanilla and whisk continually on medium heat until sugar has fully dissolved and steam begins to rise over the pot.
  3. Remove from heat and pour into 6 glasses.  Let cool on the counter for several minutes, then place in the fridge for at least 4 hours.  Add your choice of sauce, jam, compote, etc. in a thin layer on top of the panna cotta after 4 hours to keep it from sinking.

Note: This dessert can be made a day ahead of time and kept in the fridge until needed.  If you want to make panna cotta in molds and tip them out make sure to rub the inside of your molds in coconut oil before pouring the dessert in.  To remove the panna cotta simply run the outside of the molds briefly in hot water.

Also, I prefer my panna cotta on the thick side.  If you don't, use one gelatin packet instead of 1 1/2.  No problem.

Thursday, December 31, 2015

Happy New Year's Eve!


Forgot to go to the store to get a few bottles of sparkling cider? Not want to buy a huge bottle when you just want a single glass?  Not a problem.  All you need is apple juice and seltzer. You can taste the difference with better quality juice, but whatever you have handy is fine.

This is such a simple drink (thanks for thinking of it Tova!)

Sparkling Apple Cider
Ingredients:

  • apple juice
  • seltzer (from a soda stream or bottle)
Directions:
  1. Pour equal parts juice and seltzer into a glass or pitcher.  Serve immediately.  Enjoy!


I hope everyone had a great 2015.  I know I did.  This was one of the first years I had New Year's resolutions and stuck to them.  I don't know if it's because I picked more than one resolution, or if it's because I didn't pick an open-ended, generic one (like" lose some weight").  My resolutions this year were to sew an Amy Butler Weekender bag, the most behemoth of bags , and to finish this reading list.

Get a head start on your New Year's resolution to read more books with our 2015 reading challenge!:

I haven't quite finished this list yet, but I'm on the last book I need and it's an audio book, so it takes FOREVER.  This list is so long, I'm just going to count it as finished.  As someone who had never done it before, completing New Year's resolutions feels great.

Here's the finished Weekender bag by the way:


I have my New Year's resolutions all figured out for 2016 too.  I liked this book list so much I'm planning on following the next one.  Here's a copy:


If you're truly book obsessed, this ultimate reading challenge will be right up your alley. Looking to broaden the scope of your reading in 2016? We will help you read a variety of books this year.:

A whole new set of books.  Yay!  I also plan on figuring out how to do a headstand.  Maybe I'll even post a ridiculous looking selfie of my headstand this coming year.

Friday, October 30, 2015

pumpkin black bottomed muffins


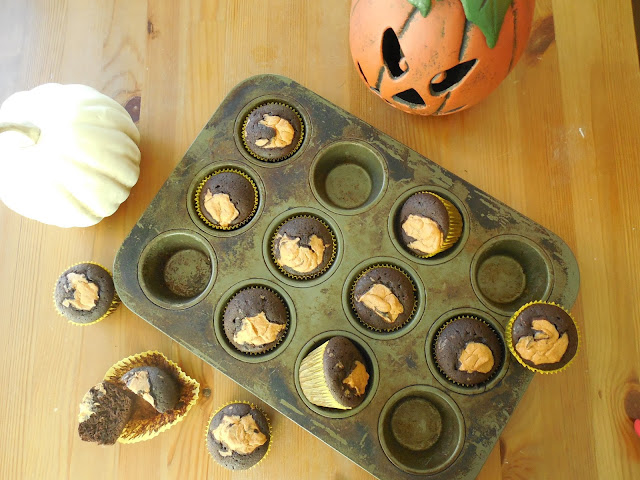
These muffins make me so happy.   Fudgy chocolate muffins topped with pumpkin goodness just can't be beat.

One of my favorite fall recipes is a cream cheese based dip (perfect for ginger snaps or apple slices).  I love it sooo much, and I wanted to find other uses for it to spread the joy when I remembered how awesome classic black bottomed muffins are.  I switched out the plain cream cheese for my dip and I really love the result.  The orange color is such a cheerful addition to the muffins, but the real treat is the pumpkin and orange flavors added.  Seriously, I want to eat the whole batch.  Luckily I've got three built in taste testers at home to eat them all for me.

I even have a clean up crew for the kitchen (in the fall at least).  It's amazing how quickly you can get a kid to help you sweep the kitchen when they realize they have a perfect witch broom to ride on already in their hands.  I kid you not.  My kitchen floors have never been cleaned than they are today.


I could have eaten this entire batch of muffin batter raw.  It looked and tasted just like fudge.  *Insert drool here*.  If you already have a well-loved chocolate muffin recipe, feel free to use it.  Just swirl a spoonful of pumpkin dip on top and bake according to your regular directions.


Seriously though, doesn't this just look like truffle filling or fudge?


I used a small spoonful over each muffin because I didn't want the entire top covered in orange, but how much you use is really up to you, as long as you don't overfill your cups.


Note: the chocolate will bake quicker than the pumpkin dip, so if the pumpkin topping still looks a bit undercooked when the muffins have finished baking, don't fret.  They firm up nicely once they've set.

 I like they messy, natural style of the orange tops, but after I made these Jeff had a great idea if you crave more structure and theme.  Pipe a large circle of pumpkin topping onto the center of the muffins and bake.  Once they've baked and set, use black frosting with a small piping tip to draw a Jack o' lantern face into the center of the orange.  Cute!


Okay, these are just gratuitous muffin shots.  I just couldn't decide which ones to post, so I posted most of them...  :)


I've had this pumpkin dip recipe for ages, and I can't for the life of me remember where I found it.  Let me know if you know who created it so I can give credit.  I love it, but it's not mine.


Pumpkin Dip

Ingredients:

  • 8 oz. cream cheese
  • 14 oz. marshmallow creme
  • 15 oz. pumpkin puree
  • 1 tsp cinnamon
  • 1 tsp orange zest
Directions:
  1. Whip the cream cheese using a stand or hand mixer for about 3 minutes, or until fluffy.
  2. Add in the pumpkin puree and blend thoroughly.
  3. Add in the marshmallow creme and blend thoroughly.
  4. Add in the cinnamon and orange zest and mix until just combined.
  5. Serve immediately or refrigerate in an airtight container until ready to serve.  
uses: 
  • dip for ginger snaps or apples
  • top chocolate muffins just before baking
  • spread between cake layers
  • etc.
note: I LOVE orange, so sometimes I like to add an extra teaspoon of orange zest.


Chocolate Muffins
makes about 12

Ingredients:
  • 3/4 cup cocoa powder
  • 1 tsp baking powder
  • 1/2 cup boiling water
  • 3/4 cup melted butter
  • 1 tbsp vanilla extract
  • 1 1/4 cups granulated sugar
  • 2 eggs
  • 1 1/3 cups AP flour
  • 1/4 tsp salt
Directions:
  1. Preheat oven to 350 degrees F, and line a muffin tin with wrappers.
  2. In a medium bowl, combine the cocoa and baking powder.
  3. Whisk in the boiling water.  Once smooth whisk in butter and vanilla.
  4. Whisk in sugar, then whisk in the eggs one at a time
  5. Whisk in the salt and flour and stir until smooth.  The batter should look like thin fudge.
  6. Use a scoop to evenly distribute the batter into the muffin cups.
  7. Spoon a small spoon of pumpkin dip over the tops of the muffins.
  8. Bake for 25-30 minutes, or until an inserted toothpick comes out clean.  Remove from the oven and let sit on the counter for 10 minutes.  Enjoy!
Note: make sure the toothpick is inserted into the chocolate and not the pumpkin, as the chocolate part cooks faster and is more accurate.

Tuesday, October 20, 2015

DIY "The Incredibles" family costumes


Okay, this photo is a little fuzzy (camera phone), and we aren't all wearing our cool masks, but this is probably the best full shot of all of us.  Gotta love family costumes.  Plus, come on, it's cute when the 3 year old is the one picking out our costume theme.


This was an easy ensemble to make.  I bought Liam's full costume and Jeff's shirt because they were easy to find and super cheap on sale (whoop whoop!).  I bought a red shirt for me and a red onesie for Jack and made the two necessary logos in felt, then hand stitched them on.


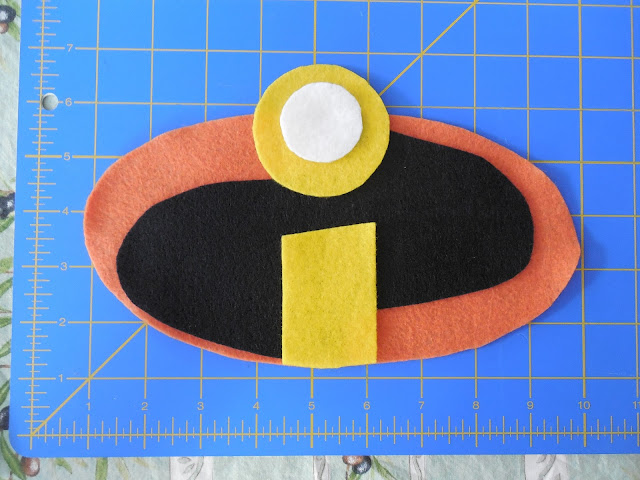
Not bad for eyeballing a logo and cutting it out in felt.  I found all the colors of felt I needed easily at Joann fabric.


Find a picture of the logo and eyeball it, cut out all your pieces, then stitch together.  It didn't take very long.


Step one: the large orange oval.


Step two: add the black over top and center.


Step three: add the yellow portion of the "I".


Step four: add the white portion of the "I".


Repeat as needed for multiple logos.  Stitch individual logo sections on in matching colored thread.


Sew the logo onto the top (onesie).


If sewing onto a women's top, keep in mind any stretch needed.  You might want to pin the logo onto the shirt while on a dress form (large pillow, etc.) to keep the correct stretch before sewing.


Grab the rest of your costume.  I used my newly logo-ed shirt, red leggings, black bike shorts, an orange spandex belt (I made this quickly with some fabric I bought), and a black mask.


Jack's hair had started going crazy by this picture (obviously), but we just had to be the Incredibles while our Jack Jack was still a baby.


This is the miracle photo, Liam actually posing!  This NEVER happens. He was just so happy to be The Incredibles, probably because he's the human embodiment of Dash.


This was a fun family costume to do, quick, easy, and cheap to make, and made it very easy to keep track of each other trick or treating (RED!).  Hopefully this can be of help to you.

Happy Halloween and costuming making!