Thursday, August 27, 2015

pumpkin carrot cake


This cake is awesome.  Do you like carrots, coconut, walnuts, pumpkin, vanilla, and pineapple?  Even if you only like one of those things you'll probably still love this cake.  It stays moist and delicious several days later (I'm really amazed we still have any left).  I love the flavor, it's a lovely mix of everything.  Jeff hates carrot cake, and nuts in baked goods and even he really liked this cake.  I love cakes like this.  It needs minimal hardware to make, and is so easy to make, it's almost impossible to screw it up.  Who doesn't love an easy cake?

Even with whole wheat flour, cornmeal, and protein powder in the batter this cake stays soft and sweet.  Yes, there is a lot of sugar, it is a cake after all.  But pretty much everything else in the cake has decent nutrients.  This is probably the most nutrient dense cake that you'll ever taste (and enjoy).  

This recipe is definitely a keeper.  I plan on making again soon.  It isn't sickeningly sweet, but is sweet enough to make the though of frosting completely unnecessary. 

Disclaimer: This is not my original recipe.  I tweaked it a bit from the original recipe found here at the Gold Medal flour site.
Pumpkin Carrot cake
 Ingredients:

  • 1 1/2 cups whole wheat flour
  • 1/2 cup vanilla whey protein powder
  • 1/4 cup yellow cornmeal
  • 2 cups sugar
  • 1 tsp salt
  • 3 tsp baking soda
  • 1 tsp baking powder
  • 1 tbsp cinnamon
  • 3 large eggs
  • 1/2 cup coconut oil
  • 2 tsp vanilla extract
  • 2 cups grated fresh carrots
  • 1 cup crushed pineapple
  • 1 cup pure pumpkin
  • 1/2 cup chopped walnuts
  • 1-1/2 cups flaked coconut
 Directions:
1. Preheat oven to 350°F. Grease a bundt pan. Set aside.
2. In a medium bowl, combine the flour, protein powder, cornmeal, sugar, salt, baking soda, baking powder and cinnamon.
3. In a large bowl, beat together the eggs, oil and vanilla until smooth. Gradually add the dry ingredients to the egg mixture. The dough will be very thick at this point.
4. Fold in the pineapple and pumpkin until well combined. Fold in the carrots and then the nuts and coconut until just combined.
5. Pour batter into the prepared cake pan and bake for 50-60 minutes until the cake is browned on top and a toothpick inserted in the center comes out clean.
6. Let the cake cool in the pan on a wire rack for 30 minutes. Turn it out onto the wire rack and let cool completely.
  
Notes:
Keep leftover cake refrigerated.

Tuesday, August 18, 2015

Buddha bowl


Can I just say, Buddha bowls are THE BEST?!  What's a Buddha bowl you ask?  Well, its essentially a bowl full (like a Buddha belly) of veggies, greens, beans, and grains.  It is a delicious  single bowl balanced meal, full of color and flavor.  All you need mixed together in a beautiful melody of food.

If you were very lazy you could throw in some chopped raw veggies, but I like to roast as much as possible to bring out flavor and texture.

Even if you are being lazy, this recipe is so simple a monkey could make it.  Really.  Cut up some veggies, sprinkle with salt, pepper, and olive oil, and throw them in the oven.  That's the most difficult part of this whole recipe.  Seriously.

The combination shown here is my favorite, but you could easily prep tons of veggies, grains, and beans and mix n' match a week's worth of meals, easy.

Buddha bowls are great because you can make them with whatever you have on hand.  No rice?  Use quinoa, couscous, barley, etc.  So many possibilities!

There are many options for protein too.  Buddha bowls are generally plant based, so I use beans mostly.  Garbanzos, white beans, lentils.... I could go on and on.

Last on the list are the greens.  I like lettuce.  Something fresh with a nice crunch.  Broccoli, brussel sprouts, kale, etc.  all good options too.


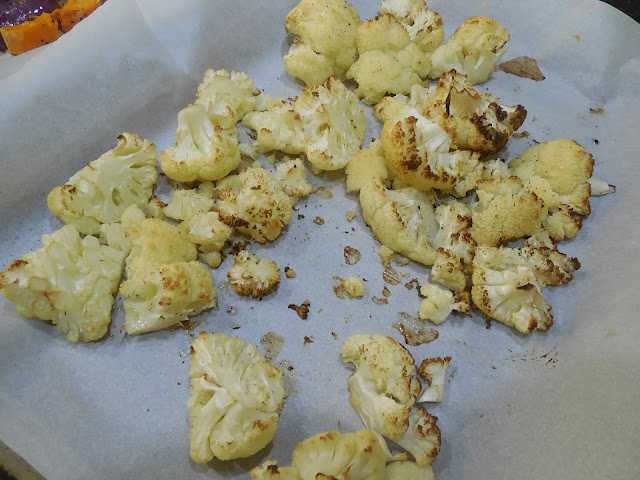
Roast some veggies.  I like to make plenty for us.  Leftovers are my friend. :)  Cauliflower is always my go-to roasted veggie.  It is so versatile and can blend in with any seasoning you choose.


Sweet potatoes, red onion, and red bell peppers.  Yum.


A batch of roasted BBQ garbanzo beans fits right in with the bowl.  A bit of heat, sweetness, and a touch of savory flavor too.


 This bowl is so chock full of yum you can't even see the rice or the red onion.

Some Buddha bowls have a gentle sauce drizzled over top.  It isn't necessary, and with all the seasonings in the garbanzos I didn't see the need for one.  A lack of sauce saves calories, and prevents everything from getting too goop-y.  IT's also tidier for kids to eat.  They make enough of a mess on their own!  :)


 Buddha bowl
serves 4

Ingredients:

  • 2 cups brown rice, cooked
  • 1 head of cauliflower, in florets
  • 1/3 red onions, chopped
  • 1 red bell pepper, chopped
  • 1 medium sweet potato, chopped
  • 1/2 small head of butter lettuce, chopped
  • salt
  • black pepper
  • 2 tsp olive oil
  • 1 batch roasted BBQ garbanzo beans

Directions:

  1. Make a batch of roasted BBQ garbanzo beans.  Set aside.
  2. Preheat the oven to 425 degrees F.  Cut up the cauliflower, red onion, bell pepper, and sweet potato and place on parchment covered baking sheets.  Sprinkle lightly with salt, black pepper, and olive oil.  Bake for 40-45 minutes, rotating the pans halfway through for even cooking.
  3. Meanwhile, make a batch of brown rice, set aside. 
  4. Chop the lettuce and set aside.
  5. When all pieces are ready, fill the bowls evenly with a little of everything.  Dig in and enjoy!
note:  If you have any leftovers, place everything but the lettuce in tupperware together and refrigerate.  Reheats really well in the microwave.

Thursday, August 13, 2015

double chocolate fig muffins


Try as I might, I just can't do these muffins in photos.  It's always difficult to capture the true yumminess of something when the chocolate makes them so dark.  I love these muffins.  They are dark, chocolatey, and fruity.


Want to hear something even better?  They're chock full of protein!  Each muffin has about 6 grams of protein in it.  This muffins are healthy (yes, they're still full of chocolate), yummy, and filling.  They are also approved by everyone at our house.

There is a very slight protein after taste, so if you REALLY are against that, just use more flour, less protein powder.  It's an even substitution.


Double Chocolate Fig Muffins
makes about 16 muffins

Ingredients:

  • 1 cup unbleached flour
  • 1 cup vanilla whey protein powder
  • 1 tbsp baking powder
  • 1 tsp baking soda
  • 1/2 tsp salt
  • 1 1/2 tbsp cocoa powder
  • 1 cup granulated sugar
  • 6 tbsp unsalted butter
  • 1 large egg
  • 2 tsp vanilla extract
  • 1 1/4 cup plain Greek yogurt
  • 1/2 cup mini semi-sweet chocolate chips
  • 3 large figs, diced
Directions:
  1. Preheat oven to 400 degrees F.  Grease your muffin tin.  
  2. In a medium bowl stir together the flour, protein powder, baking powder, baking soda, salt, and cocoa powder.  Set aside.
  3. Cream together the butter and sugar in a stand mixer.  Add in the egg and vanilla and mix again.  Mix in the Greek yogurt, then slowly add in the dry ingredients while mixing on low.  Do not over-mix.  The batter should be fluffy and light.  Gently stir in the chocolate chips and the diced figs.
  4. Evenly spoon the batter into the muffin cups and bake for about 20 minutes, or until an inserted toothpick comes out clean.  Let cool for 10 minutes, then remove from the muffin tin and let cool completely on a wire rack.
note: these muffins make a great healthy snack for kids.  If you want to make the recipe using mini muffins, bake for 16 minutes instead of 20.

Monday, August 10, 2015

Butternut Squash Risotto


This risotto was sooo good!  I was just playing around with new ways to use butternut squash.  I love it, but I don't always want to use it in the same old recipes every time.  I love figuring out new recipes that taste good, are healthy, and that the whole family loves.  Yay!

Jeff hates white rice (too sticky and mushy) so I used brown rice.  I liked the way the risotto turned out with it.  Not complete mush, but still soft.  Healthier with brown rice too.  If you're a purist you could use the traditional arborio rice,

This dish was great for the to eat.  Liam loves rice and squash, so he had no problems eating it (although he DID freak out for a while after he dropped his plate on the way to the table), and Jack is going through a MASSIVE independent phase where he refuses help eating.  The risotto is sticky enough to stay on a spoon pretty well, but not so sticky the the kids hands were a mess.  Jack ate about half his bowl full with his spoon, then gave up and tried to drink the rest.  :)

Bonus of making risotto?  I can see the TV from my stove, and I got to binge on Netflix while making dinner.  :)  This dish really didn't need a lot of close attention, just absent mindedly stirring, so I didn't have to worry so much about messing it up.


Butternut Squash Risotto
serves 4-6

Ingredients:

  • 48 oz chicken broth
  • 1 1/2 cups brown rice
  • 1 medium butternut squash, small cubes
  • 1 medium onion, diced
  • 4 garlic cloves, diced
  • 2 tbsp olive oil, divided
  • salt
  • black pepper
  • 2 tsp thyme
  • 1 tsp cayenne pepper
  • 1 spoonful of sugar (optional)

Directions:

  1. Preheat oven to 425 degrees F.  Cover a baking pan with a piece of parchment paper and lay the cubed squash in an even layer on top.  Drizzle with 2 tsp of olive oil, and a light sprinkle of salt and pepper.  Bake for about 45 minutes, until squash is soft with lightly golden edges.
  2. Dice the onion and garlic and saute on medium heat in a large pot with the remaining olive oil, and a light sprinkle of salt and pepper.  Stir occasionally for about 5 minutes, until fragrant and soft.
  3. Add the rice and broth to the pot.  Leave the pot alone for about 20 minutes or so.  When the rice has absorbed most of the broth start stirring.  You'll be doing this pretty often from this point on.  Either stirring or watching the pot to see if it needs to be stirred.  When the squash is ready dump it into the pot.  Add the thyme and cayenne and stir everything together.  Taste and add more seasonings if needed.  When the rice is soft enough and the broth has been absorbed, the risotto is ready to remove from heat.  Serve immediately. 
note: some squash is sweeter than others.  If your squash isn't very sweet you might want to add a spoonful of sugar to your risotto.  Just stir it right in.

Thursday, August 6, 2015

chocolate protein smoothie


I NEVER remember to eat breakfast.  I make it for everyone else, but mornings are when I wander around the house getting everything done.  It's gotten to the point where I had to put a sticky note on top of the coffee maker reminding me to eat breakfast.  Because of course I would never forget my morning coffee.

My best bet for breakfast is a grab and go option.  I love things like cinnamon rolls (obviously), but I'm either busy or I don't want anything too filling.  This drink is perfect.  Filling, easy to grab, and delicious.


To make this drink even easier and quicker in the morning I dump all the ingredients into tupperware in the fridge the night before.  That way the chia is easier to blend (having had all night to plump up), and all I have to do in the morning is dump one container's contents in the blender.  Simple.

I normally end up making a double batch though.  Everyone always asks for "just a few sips", and that adds up quickly!

I love having a super thick smoothie that fills me up and gives me hours of energy, especially when it feels and tastes like I'm drinking a chocolate shake (for breakfast.  Yay!)


This is the average meal for Jack and me on days when Liam is at preschool and Jeff is at work.  They almost always end up with bits of sandwich, plus a train (or two) and a cat on the table with us.  Plus Jack always decides that whatever I'm eating is what he wants.  We'll be eating THE SAME THING, but mine is in a different container than his, so...


If I'm using a cup, plate, bowl, etc. that looks like he could easily break it then Jack wants it even more.  And heaven forbid I try to help him hold it.  Nope.


He stills makes me a little nervous, but he hasn't broken any dinnerware yet *sigh of relief*.  I'm happy to share.  :)


Chocolate Protein Smoothie
makes 1 large or 2 small servings

Ingredients:

  • 2 cups unsweetened vanilla almond milk
  • 3 tbsp chia seeds
  • 1 heaping tbsp cocoa powder
  • 1 scoop protein powder (I prefer vanilla flavored whey)
  • sugar to taste
  • 1 banana, frozen
  • ice (optional)
Directions:
  1. For best results combine all ingredients overnight in the fridge.  In the morning pour out into a blender.  Blend thoroughly.  Enjoy immediately.
note: Ice is only needed if you do not use a frozen banana, or if you want an extra cold and icy smoothie.

If you make the smoothie entirely in the morning it might take a little more blender time to break up the chia seeds.

Saturday, August 1, 2015

wrap dress: Gertie Sews Vintage Casual


I'm so excited about my new dress.  First of all, pockets!  I love a good dress with pockets.  I'm pretty sure I'm going to sew them into all my handmade dresses from here on out.

I love this pattern too.  It's the wrap dress from Gertie Sews Vintage Casual.  I highly recommend this book if you like vintage styles and sewing.  Its got some really cute basic pieces.

That being said, I had to alter this dress quite a bit.  Apparently my sizing is not the same as the book's.  I made the whole dress with the book sizing (trying pieces on as I made them and they seemed fine), but when I finished the dress and tried it on...frump city.


I had to take in the top (front and back) because it was so puffy, I changed the sleeves from short sleeves to more flattering cap sleeves, I raised the waistline 2", and I raised the hem about 5".

Even with all the alterations though the dress only took about a weekend to make.  Not bad!


The whole point of making this dress was because I have all these cute sundresses in material completely unsuitable for heat.  Polyester and whatnot.  No thanks.  I HATE fabric that clings to you in the summer.  I need to breathe.  This dress is just simple cotton and breathes wonderfully.

Another great thing about this dress.  It's a full on wrap dress, but it crosses over plenty in the front so I don't have to worry about a little breeze making my flash anyone.  Always a plus!

Funny enough, I actually bought this fabric for this project to be a wearable muslin.  I found cute vintage-y looking fabric super cheap from the quilting cotton section of Joann (plus a 50% off coupon, woohoo!).  I figured if I messed up royally, or the dress turned out too frumpy I could just cut my losses.  Turns out I didn't need to.  Yay!

I really love this dress.  It's so cute and comfy!  Now I still have my original fabric I bought for this, so I can make myself a second one.


These pictures look so awkward.  I always feel weird having my picture taken.  Really, I only have so many up is so you can see the dress.


Yay pockets!  Yes, I really felt that needed to be said again.

Oh, and when I finally finished the dress, I tried it on and showed it to Jeff to get his opinion.  He took one look and said, "You look like a cute 50's housewife.  Do you have a string of pearls to wear with it?"

I'll take it.  :)